
What is a printable recipe card: a home cook's guide

TL;DR:
- A printable recipe card is a durable, standardized document that organizes essential culinary information for easy use. It comes in standard sizes like 3x5, 4x6, and 5x7 inches, with the 4x6 size being the most popular for home cooking. Proper printing, design, and personalisation enhance its practicality and sentimental value as a cooking keepsake.
A printable recipe card is defined as a portable, standardised document designed to hold essential culinary information, including a recipe title, ingredient list, preparation instructions, and serving size, in a compact physical format. The standard sizes are 3x5, 4x6, and 5x7 inches, each suited to different storage and readability needs. These cards sit at the intersection of kitchen practicality and personal expression, making them one of the most enduring tools in home cooking and meal planning. Whether you are building a family recipe collection or preparing a thoughtful gift, a well-designed recipe card does the job better than a screenshot or a bookmarked webpage ever will.
What is a printable recipe card and why does it matter?
A printable recipe card is the physical, ready-to-print version of a recipe template, formatted to a standard card size and designed for repeated kitchen use. The term “printable” distinguishes it from handwritten cards or digital-only formats. You download or create the template, print it at home or through a print service, and end up with a durable, tangible card you can prop up on the worktop while you cook.
The core purpose is clarity under pressure. When your hands are covered in flour and the timer is running, you need information that is fast to scan and impossible to misread. A well-structured recipe card delivers that. It organises the recipe into a predictable layout so your eye goes straight to the next step without hunting through a wall of text.

Recipe cards also serve a social function. They are the format of choice for sharing recipes at family gatherings, as wedding or baby shower gifts, and as part of community cookbooks. A printed card feels considered in a way that a forwarded link does not. That combination of function and sentiment is why recipe cards are passed down through generations and treated as genuine keepsakes.
Standard sizes and formats for recipe cards
The three standard sizes each serve a distinct purpose, and choosing the right one affects how much information fits comfortably on the card and how you store it.
| Size | Dimensions | Best for |
|---|---|---|
| Small | 3x5 inches | Simple recipes, index card boxes |
| Standard | 4x6 inches | Most home recipes, photo albums |
| Large | 5x7 inches | Complex recipes, decorative display |
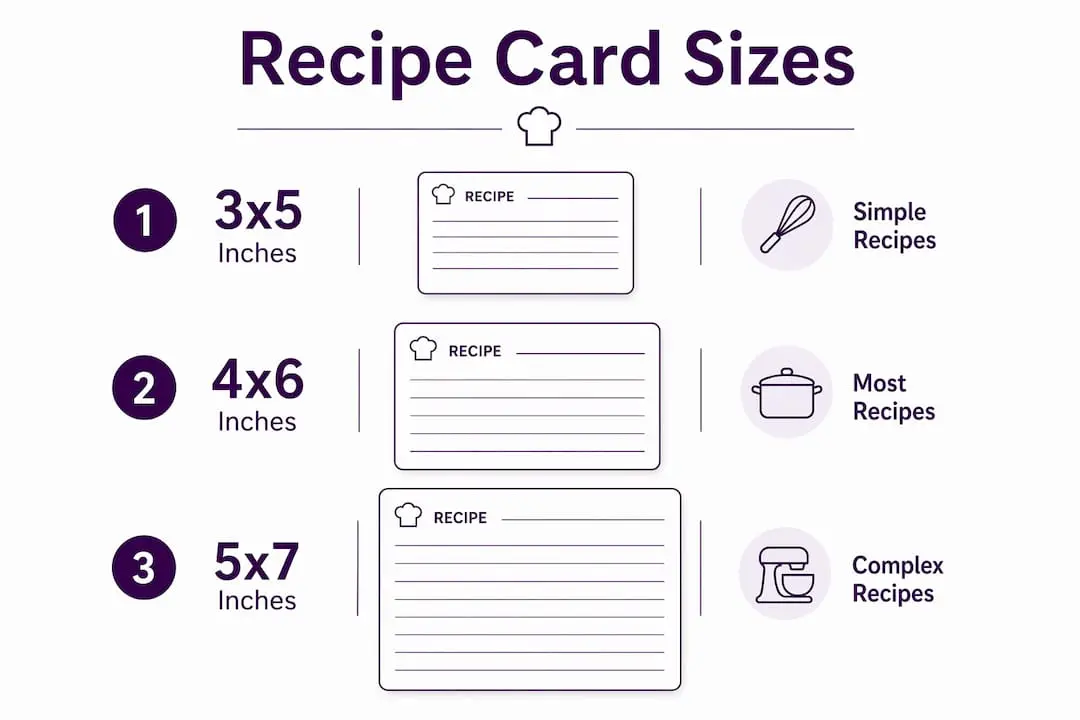
The 3x5-inch card is the classic index card format. It fits neatly into standard recipe boxes and is ideal for short recipes with few ingredients. The limitation is space: anything with more than six or seven steps will feel cramped. The 4x6-inch card is the most popular choice for home cooks. It offers enough room for a full ingredient list and a clear set of instructions without becoming unwieldy. Most photo albums and recipe binders are designed around this size. The 5x7-inch card suits complex recipes or cards where you want to include a photograph, decorative borders, or additional notes such as wine pairings or plating suggestions.
Formats and file types
Digital templates have replaced handwriting as the standard method for creating recipe cards. The most common file format is an editable PDF, which preserves layout and fonts across different devices and printers. Word processor templates (such as those in Microsoft Word or Google Docs) are a practical alternative for home cooks who want to type directly into the card without design software.
Pro Tip: Always print a test page on standard paper before loading your cardstock. This lets you check alignment and scaling without wasting expensive materials.
Cardstock and print settings
Heavy cardstock or photo paper is the recommended material for durable recipe cards. Standard 80gsm printer paper buckles when it gets wet or greasy, which is inevitable in a working kitchen. A weight of 200–300gsm gives the card enough rigidity to stand up to daily use.
Print settings are where most home cooks go wrong. Selecting “Actual size” or “100%” in your printer dialogue preserves the intended card dimensions. Leaving “Fit to page” selected stretches the design and distorts the proportions, which means your 4x6-inch card prints at a slightly different size and will not fit standard storage systems.
What should a recipe card include?
The mandatory fields on any recipe card are the recipe title, a full ingredient list with precise measurements, step-by-step instructions, and the yield or serving size. These four elements give the cook everything needed to reproduce the dish reliably.
Core fields every recipe card needs:
- Recipe title (clear and specific, e.g. “Lemon Drizzle Cake” not just “Cake”)
- Ingredient list with quantities and units (e.g. 200g plain flour, not “some flour”)
- Preparation and cooking time
- Step-by-step method, numbered for clarity
- Serving size or yield
Optional fields that add real value:
- Allergen flags (gluten, dairy, nuts, eggs)
- Nutritional information per portion
- Cost per portion (useful for meal planning on a budget)
- Storage instructions and shelf life
- Plating or presentation notes
- Personal notes or variations
Professional recipe cards prioritise weight-based measurements (grams and ounces) over volume measurements (cups and tablespoons). Weight is more precise and produces consistent results, particularly in baking. A cup of flour can vary by as much as 30% depending on how it is scooped, whereas 200g is always 200g.
Typography and layout
A font size of 12–14pt with a sans-serif typeface is the standard recommendation for recipe card readability. Sans-serif fonts such as Arial, Helvetica, or Open Sans are easier to scan quickly than serif fonts, which matters when you are mid-cook and glancing at the card between steps.
White space is not wasted space. Leaving adequate margins and spacing between sections lets the eye move through the card without effort. A cluttered card with tiny text and no breathing room is harder to use than a card with slightly less information presented clearly.
Pro Tip: Divide your card into two visual zones: ingredients on the left or top, method on the right or bottom. This mirrors the natural reading flow and speeds up reference during cooking.
How to design and print high-quality recipe cards
Designing a recipe card does not require professional software. The right approach depends on your confidence level and how polished you want the result to be.
Step-by-step design and print process
- Choose your size. Decide between 3x5, 4x6, or 5x7 inches based on recipe complexity and your storage system.
- Select a template or design from scratch. Editable PDF templates are the fastest route. Word processor templates work well for text-heavy cards. Graphic design programs give you full creative control over layout, colour, and imagery.
- Add your content. Fill in all mandatory fields first, then add optional extras if space allows. Keep the ingredient list and method visually distinct from each other.
- Check your font size. Set body text to 12–14pt minimum. Use a slightly larger or bolder font for the recipe title so it reads at a glance.
- Add bleed margins. If you plan to trim the card after printing, add a 3mm bleed around the edges of your design. This prevents white borders appearing if the cut is slightly off.
- Print a test copy. Use standard paper first. Check that the layout fits, the text is legible, and nothing is cut off at the edges.
- Print on cardstock. Load your 200–300gsm cardstock and print at “Actual size” or “100%” scale. Never use “Fit to page.”
- Trim with a paper cutter. A paper cutter produces cleaner edges than scissors and gives a professional finish. Align the card carefully before cutting.
Common printing mistakes to avoid
The single most common error is incorrect print scaling. Printing at “Fit to page” stretches the card design to fill the paper, which means a 4x6-inch card prints larger than intended and will not fit a standard recipe box or album sleeve. Always confirm the scale setting before printing a full batch.
A second frequent mistake is printing on the wrong side of photo paper. Glossy photo paper has a coated side and an uncoated side. Printing on the uncoated side produces dull, smeared results. Check the paper packaging for guidance on which side to load face-up in your printer.
Pro Tip: Once printed and trimmed, laminate your most-used recipe cards or apply a matte self-adhesive film. This protects against splashes and grease without making the card look overly shiny.
| Mistake | Consequence | Fix |
|---|---|---|
| “Fit to page” scaling | Card prints oversized, distorted | Select “Actual size” or “100%” |
| Standard 80gsm paper | Card buckles with moisture | Use 200–300gsm cardstock |
| No bleed margin | White edges after trimming | Add 3mm bleed to design |
| Scissors for trimming | Uneven, ragged edges | Use a paper cutter |
For home cooks who want to explore creative uses of printable templates, the same design and print principles apply across a wide range of projects beyond recipe cards.
Creative ways to personalise and organise your recipe cards
Personalisation is what turns a functional recipe card into something worth keeping. A card with a decorative border, a small photograph of the finished dish, or a handwritten note in the margin carries meaning that a plain typed card does not.
Ideas for personalising your recipe cards:
- Add a photograph of the finished dish in one corner of a 5x7-inch card
- Use a colour scheme that matches your kitchen or a seasonal theme (warm oranges for autumn, pastels for spring)
- Include a short personal note, such as where the recipe came from or a memory attached to it
- Use a distinctive font for the recipe title to give each card its own character
- Add a small decorative border or illustrated motif relevant to the dish (herbs for a pasta recipe, a teacup for a biscuit recipe)
For gifting, recipe cards work particularly well as part of a curated set. A collection of ten family recipes printed on matching cards, tied with ribbon, and placed in a small recipe box makes a thoughtful and personal gift. You can find inspiration for handmade card decoration ideas that translate directly to recipe card styling.
Organisation systems that actually work
The most effective organisation system is the one you will actually maintain. The two most popular options are recipe boxes and ring binders.
A recipe box with tabbed dividers organised by category (breakfast, mains, desserts, baking) is compact and sits neatly on a worktop. It works best with 3x5 or 4x6-inch cards. A ring binder with plastic sleeve inserts protects cards from kitchen splashes and lets you add or remove cards easily. It suits cooks who update their collection frequently or who use larger 5x7-inch cards.
A third option is a hybrid approach: keep your most-used cards in a box on the worktop and store the full collection in a binder. This keeps daily cooking simple without losing access to the wider archive.
Pro Tip: Write the category and card number on the back of each card (e.g. “Baking / 07”). If a card falls out of its section, you can refile it instantly without guessing where it belongs.
Key takeaways
A printable recipe card is the most practical format for organising and sharing recipes because it combines standardised structure, durable materials, and personal customisation in a single physical object.
| Point | Details |
|---|---|
| Standard sizes matter | Choose 3x5, 4x6, or 5x7 inches to match your recipe complexity and storage system. |
| Print settings are critical | Always select “Actual size” or “100%” scale to preserve card dimensions when printing. |
| Content structure drives usability | Include title, weight-based measurements, numbered steps, and serving size as a minimum. |
| Cardstock beats standard paper | Use 200–300gsm cardstock or photo paper for cards that survive daily kitchen use. |
| Personalisation adds lasting value | Decorative details and personal notes turn functional cards into keepsakes worth passing on. |
Why I think most people overcomplicate recipe cards
People spend hours searching for the perfect template when the card itself is not the hard part. The hard part is deciding what to put on it and committing to a consistent format across your whole collection. I have seen beautifully designed cards that are nearly unusable because the cook tried to fit a three-page recipe onto a 3x5-inch card in 8pt font. The design is irrelevant if you cannot read it with floury hands at arm’s length.
My own approach is deliberately plain. I use a 4x6-inch card, a clean sans-serif font at 13pt, and a two-column layout: ingredients on the left, method on the right. No photographs, no decorative borders on the working copies. The decoration goes on the gift sets. The kitchen copies are built for speed and legibility.
The insight that changed how I think about recipe cards came from professional kitchen practice. Restaurant recipe cards list ingredients in grams, not cups, because precision matters when you are scaling a dish up or down. I adopted the same habit at home and my baking improved noticeably. The card forced me to be exact in a way that “a handful of” never did.
The other thing worth saying is that a printed card beats a phone screen in the kitchen. Screens go dark, get splashed, and require clean hands to scroll. A card stays open, stays visible, and does not need charging. The format is old because it works.
If you have been putting off building a recipe collection because the project feels large, start with five cards. Write out the five dishes you cook most often. Print them, trim them, and put them in a box. That is a working system. You can expand it later.
— Rob
Craftsuprint’s craft supplies for your next printable project
Printable recipe cards are just one of the many projects where quality materials make a real difference to the finished result. Craftsuprint stocks a wide range of craft supplies suited to home printing projects, including cardstock, decoration materials, and craft tools that give your cards a professional finish.

Whether you are creating a recipe card collection for your own kitchen or putting together a handmade gift set, Craftsuprint’s marketplace connects you with the materials and templates you need. New members can also claim a free craft kit to get started without any upfront cost. Browse the full range and find everything in one place.
FAQ
What is a recipe card used for?
A recipe card is used to record and share a recipe in a compact, easy-to-read format. It holds the title, ingredients, method, and serving size so the cook can follow the recipe without referring to a book or screen.
What size should a printable recipe card be?
The three standard sizes are 3x5, 4x6, and 5x7 inches. The 4x6-inch size suits most home recipes and fits standard recipe boxes and photo album sleeves.
What paper should I use for printing recipe cards?
Use heavy cardstock or photo paper at 200–300gsm for durability. Standard 80gsm printer paper is too thin for kitchen use and will buckle when exposed to moisture or grease.
How do I stop my recipe cards printing the wrong size?
Select “Actual size” or “100%” in your printer settings before printing. Leaving “Fit to page” selected stretches the design and produces cards that are larger than the intended dimensions.
Can printable recipe cards be used as gifts?
Yes. A curated set of recipe cards printed on matching cardstock, organised by category, and presented in a recipe box makes a personal and practical gift for weddings, housewarmings, or family occasions.