
What is a pop-up card mechanism? A crafter's guide

TL;DR:
- A pop-up card mechanism uses precise folds and cuts to transform flat paper into three-dimensional, moving scenes. It relies on fundamental mountain and valley folds to create tension and movement, with various mechanisms like V-folds, sliders, and layered boxes producing different effects. Proper material choice, accurate folding, and thorough testing are essential for durable, functional, and visually impressive pop-up cards.
A pop-up card mechanism is a specialised internal paper structure that transforms a flat card into a three-dimensional scene when opened. The engineering behind it is simpler than most crafters expect, yet the results feel genuinely magical. Understanding what is a pop-up card mechanism means understanding how precise folds and cuts create tension, movement, and depth from a single sheet of cardstock. This guide covers the core fold types, the most useful mechanisms, the physics that make them work, and a practical step-by-step for building your first one.
What is a pop-up card mechanism and how does it work?
A pop-up card mechanism is defined as any combination of folds and cuts that causes paper to rise, slide, or expand when a card is opened. The industry term used by paper engineers is “paper engineering,” and the mechanisms themselves are classified by their geometry: how the folds are oriented relative to the card’s spine. The V-fold is the most beginner-friendly mechanism, using two parallel cuts roughly 1 inch long and 1 inch apart on a folded piece of paper. When the card opens, the cut section springs forward, creating a platform that appears to leap from the page.
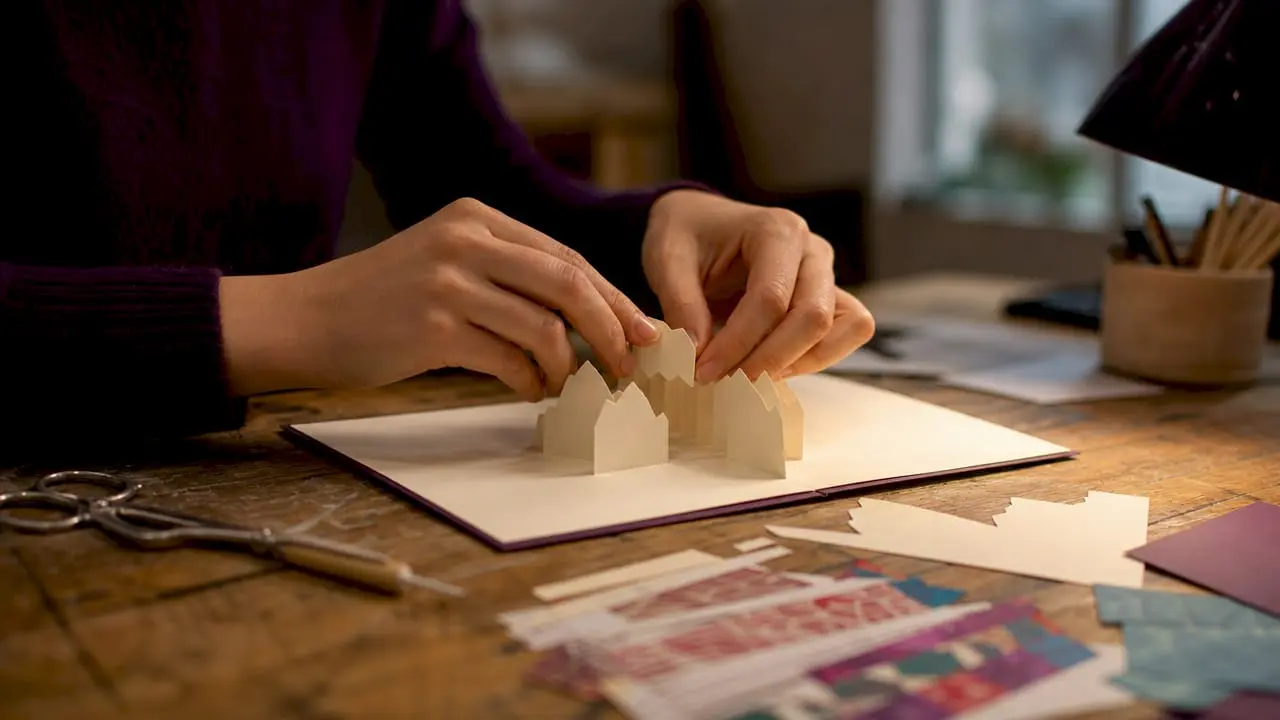
The appeal of pop-up mechanisms is not just visual. The recipient interacts with the card physically, opening it to trigger the surprise. That moment of motion is what separates a pop-up card from a flat printed design. Paper engineering as a discipline draws on geometry, material science, and spatial thinking, yet the entry point for crafters is genuinely accessible. A bone folder, a craft knife, a metal ruler, and medium-weight cardstock are all you need to start.
The role of mountain and valley folds in pop-up construction
Every pop-up card mechanism depends on two fundamental fold types: the mountain fold and the valley fold. Mountain folds push paper upward toward the viewer, while valley folds direct paper inward, away from the viewer. Together, they create the tension that allows a mechanism to spring open and collapse flat when the card closes. Without the correct combination of both, the mechanism either refuses to lie flat or fails to pop up cleanly.
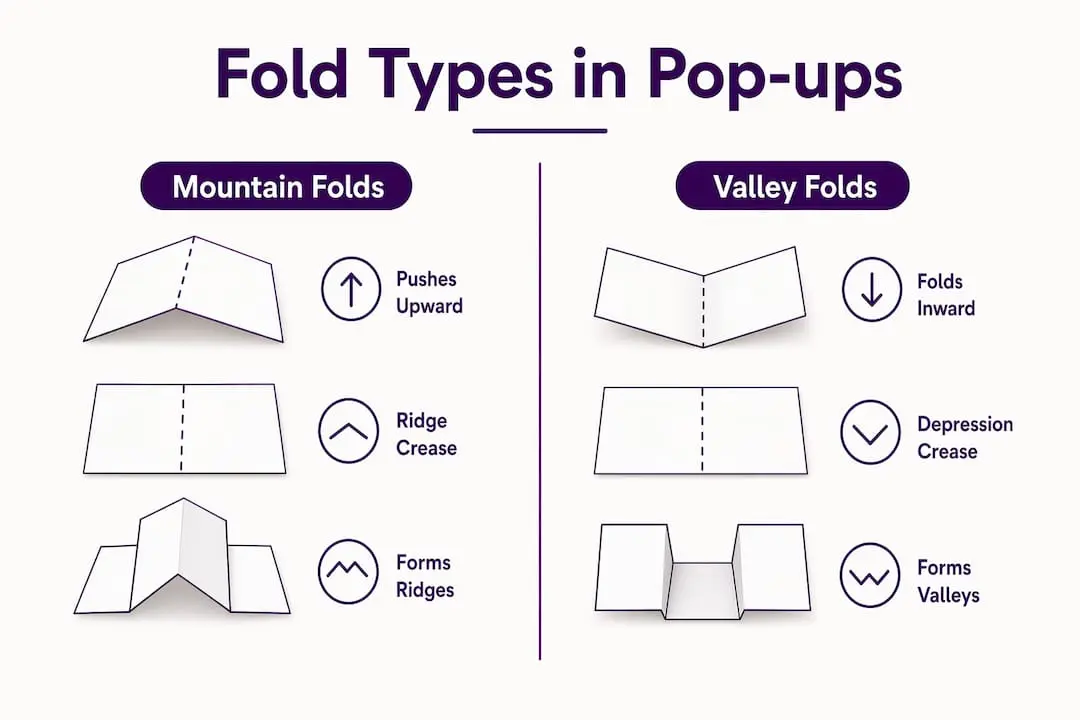
The relationship between these two fold types is what controls movement. A mountain fold along the card’s spine paired with valley folds on the mechanism’s tabs creates the classic springing effect. Incorrect fold direction is the single most common beginner mistake, and it causes the mechanism to buckle rather than move smoothly.
Mountain folds
A mountain fold is made by folding the paper away from you, so the crease forms a ridge pointing upward. When you look at the card from the front, a mountain fold pushes the mechanism toward the viewer as the card opens. This fold type provides the upward force that makes elements appear to rise from the page.
Valley folds
A valley fold is the opposite: you fold the paper toward you, creating a crease that dips downward like a valley. Valley folds pull elements inward and create the collapsing motion that lets the card close flat. Most pop-up mechanisms use valley folds on the tabs that attach the element to the card base.
- Score every fold line with a bone folder before creasing. This prevents tearing and produces a clean, sharp fold.
- Always fold in the correct direction the first time. Reversing a crease weakens the paper fibre and reduces the mechanism’s lifespan.
- Test each fold individually before assembling the full mechanism.
- For cards that need to fit standard envelopes, the closed mechanism must sit completely flat. Check this before adding any decoration.
Pro Tip: Fold along the grain of the cardstock wherever possible. Paper folds more cleanly and with less resistance when the fold runs parallel to the grain direction. To find the grain, gently bend the sheet in both directions. The direction with less resistance is along the grain.
Common types of pop-up mechanisms: V-folds, sliders, and box folds
Different fold types create distinct mechanical effects, including height, angular movement, and sliding motion. Choosing the right mechanism depends on the visual effect you want and the complexity you are comfortable building.
V-fold mechanisms
The V-fold is the foundation of most pop-up card designs. Two parallel slits cut into a folded card create a tab that folds inward, forming a “V” shape that springs outward when the card opens. This simple mechanism forms the basis for many more complex designs. You can attach decorative elements to the platform it creates, making it appear as though figures, buildings, or shapes are standing inside the card. The V-fold works best with elements that are symmetrical and not too heavy.
Slider mechanisms
A slider mechanism uses a strip of paper that moves horizontally when the card is opened or a tab is pulled. Precise scoring at intervals of ½ inch, 1 inch, 1½ inch, and 2 inch enables the sliding motion. The scored strip threads through slits cut in the card base, and pulling it causes an attached element to travel across the card. Sliders add a sense of animation and are particularly effective for cards with moving characters or vehicles.
Layered box folds
Layered box folds allow multiple pop-up elements to trigger sequentially as the card opens. Each layer is attached at a slightly different depth, so the elements appear to stack in three-dimensional space. This mechanism suits more advanced crafters because it requires careful measurement to ensure all layers collapse flat simultaneously when the card closes.
| Mechanism | Motion type | Complexity | Best use |
|---|---|---|---|
| V-fold | Upward spring | Beginner | Standing figures, platforms |
| Slider | Horizontal slide | Intermediate | Moving characters, vehicles |
| Layered box fold | Sequential depth | Advanced | Scenes with multiple elements |
| Parallel fold | Symmetrical rise | Beginner | Symmetrical shapes, text |
| A-fold | Angular pivot | Intermediate | Diagonal or angled elements |
Pro Tip: When building a slider mechanism, cut the slit in the card base fractionally wider than the strip’s thickness. A slit that is too tight causes the slider to drag and eventually tear. A slit that is too loose makes the motion feel sloppy. Aim for a snug but frictionless fit.
Design considerations for durable and functional mechanisms
Material choice is the first design decision, and it affects every other aspect of the mechanism’s performance. Cardstock must be durable yet flexible to hold weight and fold properly. Paper that is too thick leads to bulky cards that will not close properly. Paper that is too thin lacks the stiffness to hold the mechanism’s shape. Medium-weight cardstock in the range of 200–280 gsm works well for most pop-up mechanisms.
Cutting accuracy matters as much as fold quality. Uneven cuts cause mechanisms to snag or buckle when the card closes. Always use a metal ruler and a sharp craft knife on a self-healing cutting mat. Replace blades frequently. A dull blade drags and tears rather than cutting cleanly, which introduces the uneven edges that cause failure.
Creative attachment techniques
Clear acetate strips create a floating illusion by making the supports nearly invisible. Attaching decorative elements with acetate rather than paper tabs means the element appears to hover in mid-air, adding visual impact without increasing bulk. This technique works particularly well for butterflies, stars, and other lightweight decorative shapes.
Best practices for construction and finishing:
- Use a bone folder and metal ruler for every score and fold. Freehand folding introduces inconsistency.
- Cut all pieces before assembling anything. Trying to cut after partial assembly leads to inaccurate measurements.
- Test the mechanism by opening and closing the card 5–10 times before final gluing. This reveals any snags or alignment issues before they become permanent.
- Apply adhesive sparingly. Excess glue seeps into fold lines and stiffens them, reducing the mechanism’s movement.
- Store finished cards flat and away from humidity. Moisture causes cardstock to warp, which distorts the mechanism geometry.
Pro Tip: Score fold lines on the reverse side of patterned or printed cardstock. This keeps the score mark hidden on the finished card and preserves the printed surface.
How do pop-up cards work? The physics behind the motion
The motion in a pop-up card is the result of stored mechanical energy. When you close a pop-up card, the folds compress the paper and store tension in the creases. Opening the card releases that tension, and the mechanism springs into its three-dimensional position. The geometry of the folds determines both the direction and the speed of that motion.
Fold angle is the key variable. A V-fold cut at 45 degrees to the card spine produces a platform that rises to a moderate height. A shallower angle produces a lower, wider platform. A steeper angle produces a taller, narrower one. V-folds and A-folds create distinct mechanical effects: the V-fold produces symmetrical upward movement, while the A-fold pivots at an angle, creating a diagonal or leaning effect. Understanding these differences lets you choose the right fold for the visual outcome you want.
Paper thickness also affects the mechanism’s behaviour. Thicker paper stores more tension but resists folding. Thinner paper folds easily but may not hold its position under the weight of attached elements. The balance between these two properties is what paper engineering experts describe as the core design challenge of pop-up card construction.
| Fold type | Mechanical effect | Typical use |
|---|---|---|
| V-fold | Symmetrical upward spring | Platforms, standing elements |
| A-fold | Angular pivot movement | Diagonal or leaning shapes |
| Parallel fold | Even bilateral rise | Text blocks, symmetrical shapes |
| Box fold | Structured 3D enclosure | Buildings, boxes, frames |
| Slider fold | Horizontal linear motion | Moving elements, animation effects |
Pro Tip: If a mechanism springs too aggressively and the card snaps open rather than opening smoothly, reduce the fold angle slightly. A gentler angle stores less tension and produces a more controlled, elegant motion.
Practical steps to make your first pop-up card
Building a basic V-fold pop-up card takes under 30 minutes and requires only a few tools. Follow these steps to create a working mechanism from scratch.
-
Fold your base card. Take an A5 sheet of medium-weight cardstock and fold it in half to create an A6 card. Press the fold firmly with a bone folder to create a sharp, clean spine.
-
Mark your cut lines. Open the card and lay it flat. Measure 1 inch from the spine and draw two parallel lines, each 1 inch long and 1 inch apart, centred on the fold. These marks define your V-fold tab.
-
Cut the tab. Using a craft knife and metal ruler, cut along both marked lines. Cut only through the top layer of the folded card. Do not cut all the way to the edges of the card.
-
Fold the tab inward. Refold the card along its spine. Push the cut tab inward so it folds away from the card’s outer surface. Crease the tab’s base firmly with your bone folder. This creates the platform that will spring forward when the card opens.
-
Test the mechanism. Open and close the card several times. The tab should spring forward cleanly when the card opens and lie flat when it closes. If it snags, check that the base crease of the tab is sharp and correctly aligned with the card spine.
-
Attach your decorative element. Cut or print a small decorative shape, such as a flower, a star, or a simple figure. Apply a small amount of adhesive to the back of the shape and press it onto the top surface of the tab. Check that the element fits within the card’s footprint when closed.
-
Decorate the card base. Add colour, pattern, or printed backgrounds to the card’s interior and exterior. Keep decoration away from the fold lines to avoid stiffening the mechanism.
-
Combine folds for added depth. Once the basic V-fold works reliably, try adding a second, smaller V-fold tab in front of or behind the first. This creates layered depth and makes the scene feel more three-dimensional. Refer to a step-by-step card making guide for more layering ideas.
Key takeaways
A pop-up card mechanism works because precise mountain and valley folds store and release tension, converting a flat sheet of cardstock into a three-dimensional, moving structure.
| Point | Details |
|---|---|
| Core definition | A pop-up mechanism uses folds and cuts to create 3D movement from flat paper when a card is opened. |
| Foundation folds | Mountain and valley folds control the direction and tension of every pop-up mechanism. |
| Mechanism variety | V-folds, sliders, and layered box folds each produce distinct motion types suited to different design goals. |
| Material matters | Medium-weight cardstock (200–280 gsm) balances durability and flexibility for reliable fold performance. |
| Test before gluing | Opening and closing the mechanism 5–10 times before final assembly prevents permanent construction errors. |
Why fold precision beats decoration every time
The most common mistake I see from crafters new to pop-up cards is spending an hour on decorative detail before the mechanism works properly. A beautifully illustrated card that buckles when you close it is a disappointment for both maker and recipient. The mechanism is the card. Everything else is secondary.
What I have found, after years of working with paper engineering, is that geometric precision in simple folds produces more impressive results than elaborate decoration on a poorly constructed base. A clean V-fold that springs perfectly every time will delight someone far more than a complex scene that snags on closing. Get the fold right first. Decorate second.
The other thing that surprises most beginners is how much the paper itself matters. I have watched crafters struggle with mechanisms that simply will not work, only to discover they were using the wrong weight of cardstock. Switching to the correct weight solves the problem immediately. It is not a skill issue. It is a materials issue.
My strongest advice is to test obsessively. Testing tension and movement before final assembly is the single habit that separates crafters who produce reliable, satisfying pop-up cards from those who produce frustrating ones. Open and close the mechanism at least five times before you glue anything permanently. If it snags once, it will snag every time. Fix it before it is fixed in place.
Pop-up card making is genuinely an engineering discipline. The satisfaction of watching a mechanism work perfectly is the same satisfaction an engineer feels when a design performs exactly as intended. Embrace that mindset. Treat each card as a small engineering problem to solve, and the creative results will follow naturally. You can find inspiration for combining mechanisms with beautiful printable designs by browsing creative card folding styles on Craftsuprint.
— Rob
Craftsuprint resources for pop-up card makers
Craftsuprint offers a wide range of printable templates, craft supplies, and downloadable kits designed specifically for pop-up card making. Whether you are building your first V-fold or experimenting with layered box folds, having the right materials and a reliable template makes the process significantly faster and more enjoyable.

Browse the full range of craft supplies on Craftsuprint to find cardstock, adhesives, and cutting tools suited to paper engineering. Members can also claim a free gift from Create and Craft, which includes exclusive downloads and printable projects to get you started. From beginner kits to advanced mechanism templates, Craftsuprint has the resources to support every stage of your pop-up card making.
FAQ
What is the easiest pop-up card mechanism for beginners?
The V-fold is the simplest pop-up mechanism. It requires only two parallel cuts on a folded card and produces a springing platform that works reliably with minimal practice.
What cardstock weight works best for pop-up cards?
Medium-weight cardstock in the range of 200–280 gsm balances durability and flexibility. Paper that is too thick will not close flat; paper that is too thin will not hold the mechanism’s shape.
How do I stop my pop-up card from buckling when it closes?
Buckling is almost always caused by uneven cuts or incorrectly directed folds. Check that each fold is creased sharply in the correct direction, and test the mechanism by opening and closing it several times before gluing.
What is the difference between a mountain fold and a valley fold?
A mountain fold pushes paper upward toward the viewer; a valley fold pulls paper inward away from the viewer. Every pop-up mechanism relies on a specific combination of both to create controlled movement.
Can I combine multiple pop-up mechanisms in one card?
Yes. Layered box folds and multiple V-fold tabs can be combined in a single card to create scenes with depth and sequential movement. Start with one working mechanism and add layers only after the first is functioning correctly.