
What are paper patterns: a hobby crafter's guide

If you’ve ever unfolded a tissue paper pattern and stared at the tangle of lines, arrows, and strange symbols wondering where on earth to begin, you’re not alone. Paper patterns intimidate far more beginners than they should. The truth is, once you understand what paper patterns are and what each marking actually tells you, they stop being mysterious and start being one of the most useful tools in your crafting kit. This guide covers everything from basic definitions to practical steps, so you can pick up any pattern with confidence and get straight to making something you’re proud of.
Table of Contents
- What are paper patterns and why use them?
- Key symbols and markings on paper patterns
- How to use a paper pattern step by step
- Preserving and reusing paper patterns
- Essential tools for transferring pattern markings
- Why mastering paper patterns changes your crafting journey
- Explore creative project patterns and supplies at Craftsuprint
- Frequently asked questions
Key Takeaways
| Point | Details |
|---|---|
| Paper patterns defined | Paper patterns are templates used to trace shapes onto fabric for cutting and sewing creative projects. |
| Essential pattern markings | Grainlines, notches, and fold lines help accurately align and assemble fabric pieces. |
| Markings transfer critical | Transferring all pattern markings onto fabric ensures pieces fit together as intended. |
| Preserve with sturdier paper | Tracing patterns onto stronger paper protects originals and allows repeated use. |
| Use correct transfer tools | A tracing wheel and special tracing paper reliably transfer pattern details onto fabric. |
What are paper patterns and why use them?
A paper pattern is a flat template, usually printed or drawn on tissue paper or paperboard, that you place onto fabric and trace around before cutting. Think of it as a blueprint. Just as a builder wouldn’t lay bricks without a plan, a crafter shouldn’t cut fabric without a reliable guide. A paper template) is used to trace shapes onto fabric before cutting and assembling a finished piece, whether that’s a garment, a soft toy, or a decorative item.
Most commercial patterns use lightweight tissue paper because it’s easy to fold, store, and see through when tracing. Sturdier paperboard versions are common in craft and quilting contexts where the pattern piece is used repeatedly. The pattern doesn’t just tell you what shape to cut. It tells you precisely how to orient that shape on the fabric, where to add seam allowance, and where pieces connect to each other.

The benefits of paper patterns go well beyond just cutting shapes. They ensure consistency across multiple pieces, they capture sizing information, and they make it possible for someone working alone at home to replicate a design that might otherwise require years of technical training to draft from scratch.
Key reasons to use paper patterns:
- They eliminate guesswork from fabric cutting
- They capture shaping details like darts and pleats that are impossible to eyeball
- They allow you to make the same project repeatedly with identical results
- They serve as a record of a design you can return to and adjust later
Key symbols and markings on paper patterns
Once you know what paper patterns are, the next step is learning to read them. The symbols are a kind of shorthand, and they’re consistent across most commercial and indie patterns once you’ve learnt them.
Pattern markings include grainline direction, fold lines, and notches used for aligning pieces accurately. Each of these serves a specific purpose:
- Grainline arrows run parallel to the selvage (the finished edge of fabric). Aligning your pattern piece along the grainline ensures the fabric drapes and hangs correctly. Ignoring it is one of the most common beginner mistakes, and it shows in the finished piece.
- Fold lines indicate that the pattern piece should be placed on a fold of fabric, producing a symmetrical shape from a single cut. The finished piece will be twice the width of the pattern.
- Notches are small triangular or rectangular marks on the cutting line. They mark where two pieces meet and must be matched for the garment to go together cleanly.
- Dart lines show where fabric is pinched and sewn to create three-dimensional shaping, particularly around the bust, waist, and shoulders.
- Button and buttonhole markings indicate exact placement for fastenings, which matters more than most beginners realise.
Understanding sewing patterns at this level takes the stress out of the cutting table and puts you in control before you even thread a needle.
Pro Tip: Before you cut anything, spend five minutes reading through the pattern sheet and identifying each symbol type. Colour-coding them with a highlighter pen makes the whole layout far easier to follow.
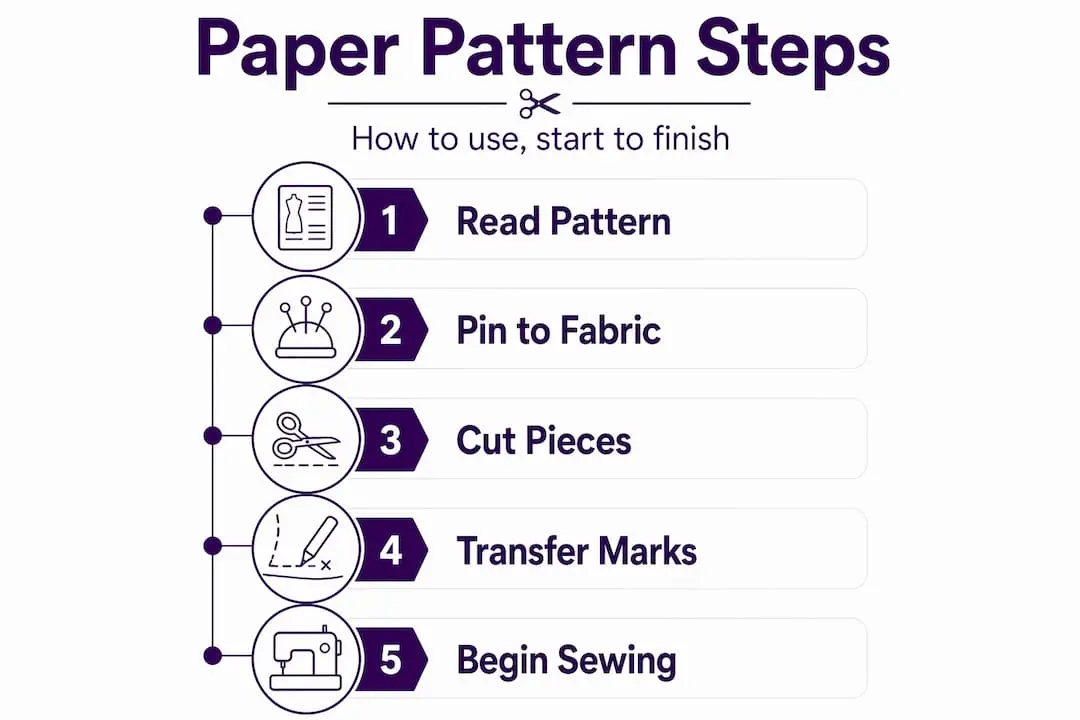
How to use a paper pattern step by step
Knowing the symbols is half the battle. Now let’s talk about how to use paper patterns in a practical sequence that prevents the most common mistakes.
Prepare your fabric and pattern first:
- Prewash and tumble dry your fabric before doing anything else. Fabric shrinks, and discovering that after sewing is genuinely disheartening.
- Press the fabric flat with an iron. Wrinkles distort your cutting line.
- Press the tissue pattern pieces too. A warm iron on a low setting smooths creases without damage.
Follow these steps when laying out and cutting:
- Read the cutting layout diagram included in your pattern instructions. This diagram shows you exactly how to arrange all the pattern pieces on your fabric for the least waste.
- Fold the fabric as directed, right sides together unless stated otherwise.
- Pin each pattern piece in place, using enough pins to keep edges flat and prevent shifting. Pin parallel to the cutting line.
- Check the grainline on every piece before cutting. Use a ruler to measure equal distance from the selvage at both ends of the grainline arrow.
- Cut carefully along the cutting line, using long, smooth strokes for straight edges and shorter snips around curves.
- Transfer all markings to the fabric immediately after cutting, while the pattern is still pinned. Use a fabric marking pen, tailor’s chalk, or small snips into the seam allowance at notch positions.
Following these sewing pattern instructions in order, rather than jumping ahead, saves a significant amount of unpicking later.
Pro Tip: Use small embroidery scissors for tight curves and corners. The extra control means cleaner cuts and less fraying at tricky points.
Preserving and reusing paper patterns
Tissue paper patterns are not built to last forever. After a handful of uses, they tear at fold lines, fray at the edges, and become genuinely difficult to work with. The smart approach is to transfer them before they deteriorate.
Transferring tissue patterns to sturdier paper preserves originals and improves tracing accuracy for multiple uses. Swedish tracing paper is a favourite because it’s slightly translucent, flexible enough to pin to fabric, and sturdy enough to cut repeatedly. Kraft paper works well for large pattern pieces. Freezer paper is particularly useful for quilting templates because it can be temporarily ironed onto fabric.
Practical tips for preserving your patterns:
- Align the grainline on your copy exactly with the grainline on the original. Even a small deviation changes how the piece behaves on the fabric.
- Label every copied piece clearly: include the pattern name, size, piece number, grainline direction, and any special instructions.
- Store copied patterns flat or rolled rather than folded to avoid new crease lines that might be mistaken for markings.
- Use a rotary cutter on your sturdier copies rather than scissors, for cleaner, faster cutting.
| Paper type | Best for | Durability | Cost |
|---|---|---|---|
| Swedish tracing paper | Garments and soft toys | High | Moderate |
| Kraft paper | Large pattern pieces | High | Low |
| Freezer paper | Quilting templates | Moderate | Low |
| Tissue paper (original) | Single or occasional use | Low | Included with pattern |
Pro Tip: Write the date on your pattern copy. If you adjust the pattern later, you’ll know which version you’re working from.
Essential tools for transferring pattern markings
Cutting the fabric is only part of the job. Getting those dart lines, button placements, and fold points onto the fabric accurately is where many hobbyists lose time. The right tools make this genuinely quick.
A tracing wheel used with dressmaker’s carbon tracing paper transfers marks cleanly to fabric as you trace pattern lines. The wheel has a serrated or smooth edge that you roll along the pattern line. Beneath the pattern and fabric, you slip a sheet of carbon-coated tracing paper, colour side against the fabric. As you roll, the pressure deposits a clear, removable line onto the fabric below.
Key points when using these sewing transfer tools:
- Choose a tracing paper colour that contrasts with your fabric. Yellow carbon paper disappears on pale linen; use blue or red instead.
- Use a smooth-edged wheel on delicate fabrics to avoid snags. The serrated wheel is better on thicker materials.
- Place a hard, smooth surface beneath everything when tracing. A cutting mat works well.
- Always test on a fabric scrap before marking your actual piece. Some tracing paper marks are harder to remove than the packaging suggests.
- Avoid pressing too hard with the wheel. Consistent, light pressure produces cleaner lines than forceful scrubbing.
Skipping this step and relying on memory to sew darts and match notches leads to misaligned seams and fitting problems that are often beyond straightforward correction.
Pro Tip: For dark fabrics where tracing paper marks won’t show, use tailor’s tacks instead: small looped stitches through the pattern and fabric at key points, snipped after the pattern is removed.
Why mastering paper patterns changes your crafting journey
Here’s what most beginner guides don’t tell you: the biggest obstacle in working with paper patterns isn’t the sewing itself. It’s the assumption that patterns are static instructions you follow once and discard. That mindset keeps crafters stuck at beginner level longer than necessary.
Tissue paper originals degrade faster than most people expect. A pattern used three or four times without being transferred starts losing its edges and accuracy. Copying patterns to sturdier paper avoids wearing originals and allows size and dart tweaks without damage. That second point matters enormously. When your pattern copy is expendable, you’re free to draw adjustments directly onto it, grade between sizes, or slash and spread for fit alterations, all without touching the original.
Grainline alignment is another area where beginners regularly underestimate the consequences of being slightly off. A piece cut even a centimetre off-grain can cause twisting, uneven hemlines, or odd pulling across the body. These problems look like sewing errors, but they’re actually cutting errors, and they can’t be fixed with a seam ripper.
Marking transfers are not optional. Notches, darts, and button placements are not decorative additions to the cutting process. They’re the engineering of the garment. Skipping them is like assembling flat-pack furniture without looking at which screw goes where.
The crafters who find creative sewing guidance most useful are often those who’ve already had a frustrating experience with patterns. They return, they learn the underlying logic, and they suddenly find that projects which once felt impossible become straightforward. Mastering the fundamentals of pattern reading, marking, and preservation doesn’t just make individual projects easier. It builds the kind of instinct that lets you look at any pattern and immediately understand what it needs from you.
Explore creative project patterns and supplies at Craftsuprint
With a solid grasp on paper patterns and how to use them, you’re well placed to start turning that knowledge into finished projects you’ll genuinely love. The gap between knowing the theory and having a great project in your hands is often just finding the right starting point.

At Craftsuprint, you’ll find a wide range of craft supplies and project resources designed specifically for hobby crafters at every level. Whether you’re looking for downloadable patterns to practise with, printable project kits, or tutorials that walk you through each stage of a new technique, everything is organised to help you move from idea to finished piece with far less frustration. Explore themed designs, mini kits, and community resources that turn your new pattern knowledge into creative results.
Frequently asked questions
What exactly is a paper pattern used for in sewing?
A paper pattern is a flat template used to trace shapes onto fabric, which are then cut and sewn to create garments or crafts. As the sewing pattern definition) makes clear, it guides every stage from cutting to assembly.
What do the grainline and notches on a paper pattern mean?
The grainline shows fabric alignment direction for proper drape, while notches mark matching points to align pieces accurately when sewing. Both are part of the standard pattern markings you’ll find on virtually every commercial pattern.
How can I prevent my tissue paper patterns from wearing out quickly?
Trace your tissue pattern onto sturdier paper such as kraft or Swedish tracing paper, then use this copy for cutting and sewing to preserve the original. Transferring to sturdier paper also makes it easier to adjust sizes without damaging what you started with.
Why is it important to transfer all pattern markings onto fabric?
Markings like darts and notches ensure correct piece placement and sewing, preventing mistakes and achieving a professional fit. Transferring all markings is not optional, as missing even one notch can cause pieces to misalign during assembly.
What tools do I need to transfer pattern markings onto fabric?
A tracing wheel and dressmaker’s carbon tracing paper are used together to transfer clear, removable markings from pattern to fabric. A tracing wheel with carbon paper is the most efficient method for marking multiple pieces quickly and accurately.