
Stay Under Etsy's 20MB: PDF vs JPG for Printable Sellers
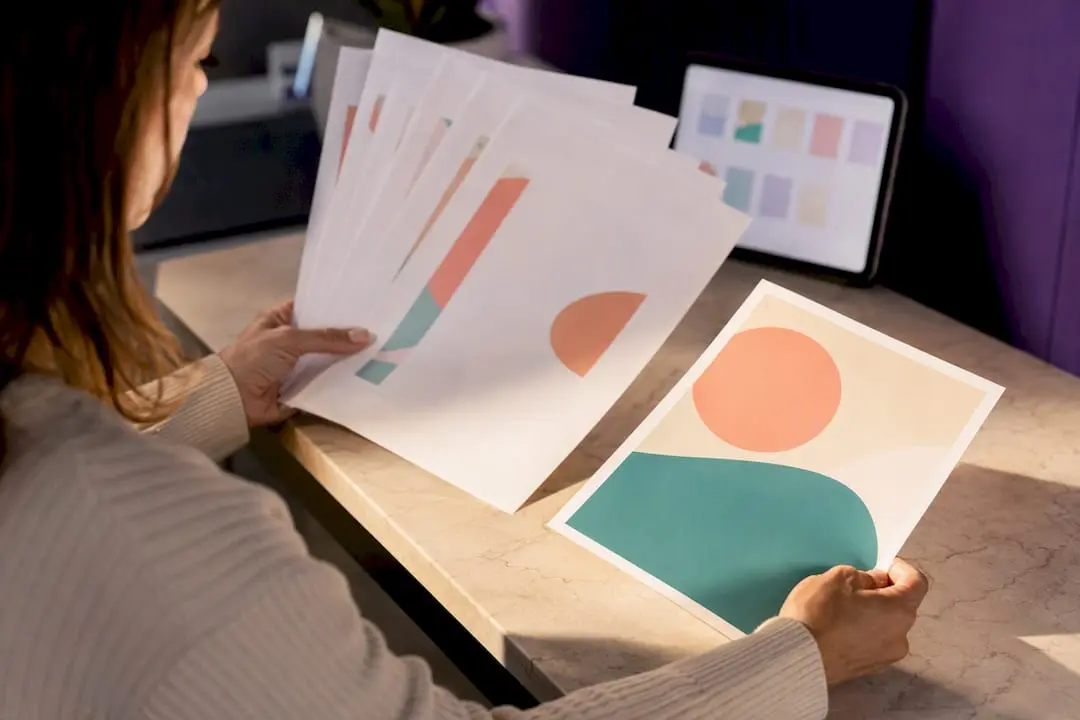
For most craft printables, use JPG for single-image wall art and PDF for anything multi-page or text-heavy. JPG at 300 DPI gives you a small, universally accepted file for a photo or a single design. PDF Print (or PDF/X) keeps multi-page layouts, fonts and bleed intact when handed to a professional printer. Craftsuprint’s own product listings follow this exact split for good reason.
TL;DR:
- Use PDF format for multi-page, text-heavy, or fixed-layout printables destined for commercial printing to ensure proper layout, fonts, and bleed.
- Export single-image wall art as JPG files at 300 DPI and high quality to keep file sizes manageable and avoid printing issues.
- Confirm pixel dimensions based on the print size, add bleed, embed fonts, and convert to CMYK when necessary to prevent color and resolution problems.
- Marketplaces like Etsy limit upload sizes to 20MB, making JPGs the preferred primary file for ease of use and compatibility, with PDFs offered as a bonus for multi-page products.
- Always check DPI, file format, and colour mode before export; correct settings reduce rework, reprints, and costly errors at the printing stage.
Table of Contents
- When to use PDF, JPG and PNG for craft printables
- Print-ready checklist: DPI, pixel dimensions, bleed and colour
- File size, compression and marketplace limits for sellers
- How to export print-ready files from Canva, Adobe and Affinity
- Craftsuprint’s recommended workflow for selling printables
- How printing costs change depending on file format
- Which formats work with which printers and print services
- Getting colour profiles right across formats
- Security and editing restrictions: PDF vs JPG
- Accessibility and ease of use for buyers printing at home
- Common mistakes sellers make with printable formats
- Export-ready templates and tutorials from Craftsuprint
- Sources
- FAQ
When to use PDF, JPG and PNG for craft printables
Format choice comes down to what the printable actually contains, not personal preference. A single decorative image behaves very differently on a press or a home printer than a twelve-page planner insert.
PDF is the right call for anything with multiple pages, dense text, or a layout you want to stay fixed no matter what device opens it. Invitation suites, planner bundles, card-making templates with instructions, and anything you’ll hand to a commercial print shop belong here. When the file is destined for a professional printer, export as PDF Print or PDF/X rather than standard PDF; these presets preserve layout, embed fonts, and support bleed and crop marks, which is exactly what a print shop’s prepress team checks for first.
JPG suits single-image wall art, photographic prints, and anything where one flat picture is the whole product. Export at 300 DPI with high quality settings and you get a compact file that opens instantly on any device, no PDF reader required.
PNG earns its place only when you need transparency or perfectly lossless pixel edges, such as logos or overlay graphics. It’s rarely the right default for a finished printable: PNG tends to be RGB only and produces noticeably larger files, which causes headaches at checkout and colour surprises at the print stage.
A quick cheat sheet for everyday sellers:
- Multi-page or text-heavy design ? PDF Print / PDF/X
- Single-image wall art or photo print ? JPG at 300 DPI
- Logo, icon, or anything needing a transparent background ? PNG
- Unsure? Default to JPG for the main file and offer PDF as a bonus
Craftsuprint’s guide to craft file formats covers the broader format landscape if you’re building a wider product range beyond these three.
Print-ready checklist: DPI, pixel dimensions, bleed and colour
Getting the technical settings right before export saves you refunds and printer complaints later. Work through this sequence every time:
- Set 300 DPI at export, not after the fact. DPI is metadata attached when you export, and a JPG and a PNG at identical 300 DPI and identical pixel dimensions will print exactly the same way — the format doesn’t magically improve resolution.
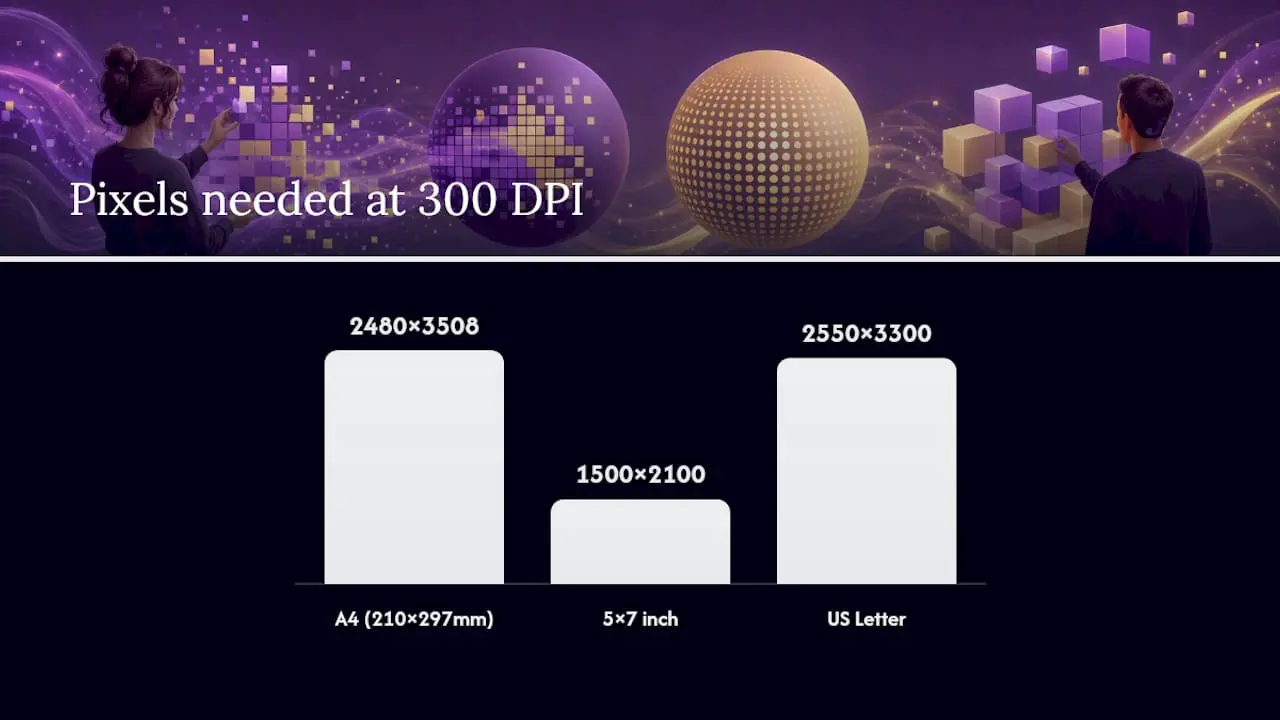
- Calculate pixel dimensions from the finished size. An A4 print (210mm × 297mm) at 300 DPI needs roughly 2,480 × 3,508 pixels. A 5x7 inch print needs 1,500 × 2,100 pixels. A US Letter page needs 2,550 × 3,300 pixels.
- Add 3mm of bleed around the edge of anything going to a commercial printer, and enable crop marks in your PDF Print export settings.
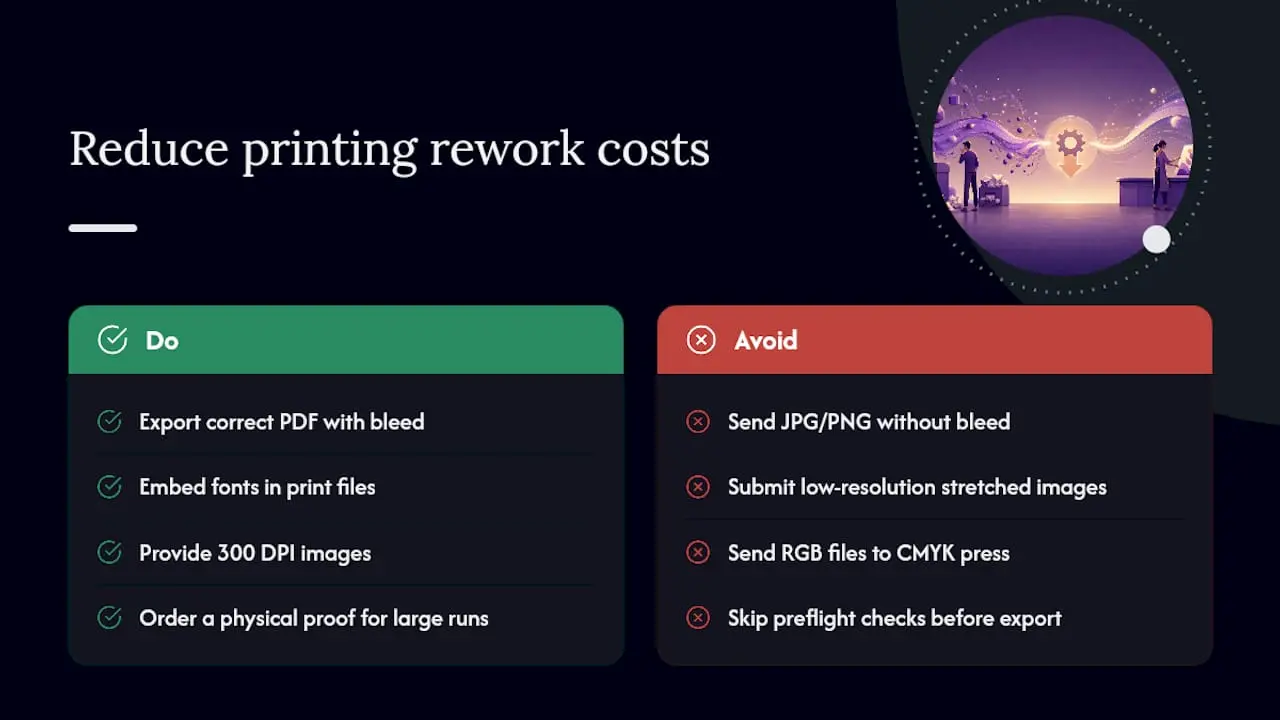
- Convert to CMYK where the print vendor requires it, and pull a physical proof before running a full batch. Screens show colour in RGB; presses print in CMYK, and the gap between the two is where colour disappointment happens.
- Embed all fonts and use vector shapes for line art and text rather than rasterised versions, so edges stay sharp at any size.
- Choose PDF/X where your printer supports it. PDF/X-4 is now the standard most professional printers prefer because it handles transparency and modern colour management properly, while PDF/X-1a demands flattened colours for older, stricter workflows.
Pro Tip: If a print shop rejects your file, ask which PDF/X variant they need before re-exporting blind. PDF/X-4 and PDF/X-1a solve different problems, and guessing wastes a print run.
If a printer reports missing fonts, blurry edges, or colour that looks washed out, the fault is almost always one of three things: DPI set too low, fonts not embedded, or an RGB file sent to a CMYK workflow without conversion.
File size, compression and marketplace limits for sellers
Marketplace platforms impose their own constraints that have nothing to do with print quality and everything to do with server costs. Etsy caps uploads at 20MB per file, and this single number shapes how most successful sellers package their printables.
JPG ratio packs at 300 DPI typically sit comfortably under that 20MB ceiling even when you bundle several print sizes into one ZIP, whereas PNG files at the same dimensions often blow straight past it. That’s the practical reason JPG has become the default primary file for wall art and single-image sellers, not just a print-quality argument.
Setting JPG quality to 90 to 95% keeps files visually lossless at 300 DPI for final print while trimming file size meaningfully compared to maximum quality settings.
A few packaging habits that reduce buyer confusion:
- Name files by ratio and size, not vague labels: “5x7_JPG”, “A4_PDF”
- Keep ZIP files under 15MB where possible, leaving headroom under platform limits
- Include a PDF as a bonus file for buyers who want an easier print document, rather than making it the primary deliverable
- Add a one-line readme inside the ZIP explaining which file suits which use
Many sellers now offer a JPG as the primary file and a PDF as an optional bonus, which covers both the wall-art buyer and the person who wants a tidy printable document.
How to export print-ready files from Canva, Adobe and Affinity
Export settings vary by tool, but the underlying goals stay identical: correct resolution, correct colour, and a format the receiving printer actually wants.
- Canva: choose “PDF Print” from the download menu, never “PDF Standard” — Standard strips print-specific data. Tick the bleed and crop mark options if your design has a background that runs to the edge, and confirm 300 DPI where the export panel offers a resolution choice.
- Adobe Creative Cloud (Photoshop/Illustrator): export as PDF/X-4 for anything heading to a press, and embed fonts during export rather than relying on outlines alone. Adobe’s own comparison notes that PDFs handle mixed text and image layouts while maintaining consistency across devices, which is precisely why it’s the safer choice for anything beyond a single photo.
- JPG exports for photographic prints: set quality to 90 to 95%, confirm the colour profile before saving, and double check pixel dimensions against your target print size rather than trusting the DPI field alone.
- Affinity Publisher/Photo: set DPI and colour mode explicitly in the export dialogue, choose a PDF/X preset when available, and verify final pixel dimensions before uploading anywhere.
If a marketplace or printer rejects your export, check three things in order: DPI value, embedded fonts, and whether the file was accidentally saved in RGB when CMYK was requested.
Craftsuprint’s recommended workflow for selling printables
Across thousands of listings, the pattern that causes the fewest support queries is simple: JPG ratio packs at 300 DPI as the default deliverable, with an optional PDF for anything genuinely multi-page or editable.
- Default to JPG for single-image designs, exported at 300 DPI in 90 to 95% quality
- Add a PDF only when the product genuinely needs multiple pages or fixed layout, such as card templates or planner inserts
- Name files by ratio and size (“8x10_JPG”, “Square_PDF”) so buyers never guess
- Keep the whole ZIP under Etsy’s 20MB ceiling by leaning on JPG’s smaller footprint
Craftsuprint’s tutorials and downloadable resources lean on exactly this structure, and it’s worth building your own template library around ratio packs early rather than repackaging every product from scratch.
How printing costs change depending on file format
File format itself doesn’t set a print price, but it drives the decisions that do. A correctly prepared PDF Print file with embedded fonts and bleed goes straight to press. A JPG or PNG missing bleed, sent at the wrong resolution, or in the wrong colour mode usually gets sent back for correction, and that rework often carries a fee or at minimum delays the job.
Home printing tells a similar story from a different angle. A low-resolution JPG stretched beyond its native pixel dimensions prints soft and blurry, which tempts buyers to reprint at a higher setting, burning through ink and paper twice for one design. A correctly sized 300 DPI file avoids that waste entirely.
Bulk print runs amplify small mistakes. A colour shift that’s barely noticeable on a single test page becomes an expensive problem across five hundred copies, particularly when an RGB file heads to a CMYK press without proper conversion. Print shops that offer a physical proof step exist precisely to catch this before the full run, and it’s worth paying for one on any print order above a few dozen copies.
The cheapest print job is very often the one that arrives correctly formatted the first time. Reprints, rush fees, and wasted stock cost far more than the few extra minutes spent checking DPI, bleed, and colour mode before you hit export.
Which formats work with which printers and print services
Home inkjet and laser printers accept JPG, PNG, and PDF without complaint, which is why JPG remains the safest universal choice for buyers printing at home. Most consumer print software opens a JPG instantly with no additional software required, unlike a PDF, which needs a reader installed.
Commercial and online print services behave differently. Professional print shops overwhelmingly prefer PDF Print or PDF/X because these formats carry the bleed, crop marks, and embedded fonts their prepress software expects, and sending a plain JPG or PNG to that kind of service often triggers a request for a proper print file before the job proceeds at all.
Photo lab services (the kind that print wall art onto photo paper or canvas) sit in the middle: most accept JPG directly and it’s usually their preferred format for a straightforward single image, since there’s no layout or typography to preserve.
The practical rule: match the format to the destination, not the design. A design bound for a home printer or photo lab is fine as JPG. The identical design heading to a commercial print shop for a large run or a multi-page product should go as PDF Print or PDF/X, even if the artwork itself never changes.
Getting colour profiles right across formats
Screens display colour in RGB. Most commercial presses print in CMYK. That gap between the two colour models is the single biggest reason a printable looks different on paper than it did on screen, and it affects every format differently.
JPG files typically carry an RGB profile by default, which is fine for screen viewing and most home printers, since consumer inkjets convert RGB automatically at the driver level. PDF files can carry either RGB or CMYK depending on export settings, which is exactly why professional print exports should specify CMYK conversion explicitly rather than leaving it to the printer to guess.
PNG shares JPG’s RGB bias, and its RGB-only nature in many workflows tends to produce visible colour shifts once converted for CMYK printing, which is one more reason it rarely suits a finished print product.
The safest habit for anything beyond casual home printing: convert to CMYK during export where your design tool allows it, and request a physical proof from your print vendor before a full run. A proof costs a small amount and catches colour problems a screen simply cannot show you, since monitor calibration varies wildly between devices.
Security and editing restrictions: PDF vs JPG
PDF carries editing and access controls that JPG simply doesn’t have. You can password-protect a PDF, restrict printing or copying, and lock the layout so a buyer can view but not modify your design. This matters for sellers offering editable templates: a form-fillable PDF lets a buyer type their own text into a fixed layout without touching your fonts or spacing.
JPG has no equivalent protection layer. It’s a flat image, fully copyable the moment someone downloads it, with no built-in restriction on reuse or redistribution. That’s not automatically a downside; for finished wall art where there’s nothing to edit, a flat JPG is exactly what most buyers want. The risk sits with sellers who want to prevent redistribution of a design meant for personal use only, where a JPG offers no technical barrier at all.
For editable products such as card templates, invitation suites, or planner inserts, PDF’s ability to lock certain elements while leaving fillable fields open is a genuine practical advantage over a flat image. Craftsuprint sellers offering customisable card-making templates lean on this distinction regularly, since it lets buyers personalise text without disturbing artwork.
Accessibility and ease of use for buyers printing at home
The format you choose changes how easy your printable actually is for a buyer to use, not just how it looks. JPG opens instantly on any device, phone, tablet, or computer, with no extra software. That matters more than it sounds: a buyer trying to print from a phone at 11pm doesn’t want to hunt for a PDF reader app first.
PDF requires a reader, though nearly every modern device has one built in or pre-installed. Where PDF wins on accessibility is multi-page products: a buyer with a twelve-page planner bundle gets one file to manage instead of twelve separate images, and can print the whole set or select individual pages from a single document.
For buyers with visual impairments or those printing via assistive technology, well-tagged PDFs can support screen readers and text scaling in ways a flat JPG image never can, since a JPG has no underlying text layer at all. If your printable includes any instructional text, a properly structured PDF is the more inclusive choice over a JPG image of the same text.
The simplest rule for usability: single image, ship JPG. Multiple pages or anything with real text content, ship PDF, and mention in your listing which reader software it needs, if any.
Common mistakes sellers make with printable formats
The errors I see repeated most often: wrong DPI slipping through because it wasn’t checked at export, missing bleed on a design meant for a commercial printer, and sending a flat JPG for what should have been a multi-page PDF. Each one is avoidable with a two-minute check before upload.
Clear file naming and a short readme inside every ZIP cut refund requests dramatically, because buyers stop guessing which file suits their printer. Fix the naming convention once and reuse it across every listing.
— Rob
Export-ready templates and tutorials from Craftsuprint
Craftsuprint gives sellers and hobby crafters a shortcut past the DPI guesswork and bleed mistakes covered above: a marketplace built around downloadable templates, ready-made kits, and step-by-step tutorials already formatted for print.

Rather than rebuilding your export settings from scratch for every new card design or planner insert, Craftsuprint’s library of Create & Craft downloads gives you pre-organised packs and templates to work from, alongside tutorials that walk through the packaging habits this article covers. Sellers building their own printable range can also browse craft supplies and paper craft resources to round out a product line, or check the free member gift currently running for new sign-ups. If you’re setting up multi-page templates specifically, the planner examples over at Vervex are worth a look for structuring a PDF pack that stays organised across several pages.
Start by browsing the current Create & Craft download categories to see how existing sellers structure their ratio packs, then apply the same naming and export logic to your own designs.
Sources
- File Type Matters: Why PDF Print (Not PNG, Not JPG) Is the Only Right Answer - Print Lord
- JPEG vs. PDF: What are the differences? - Adobe
- Best File Format for Etsy Printables: JPG vs PDF vs PNG - SnapToSize
FAQ
Is it better to print JPG or PDF?
For a single image or photo, JPG at 300 DPI prints just as well as any other format and opens more easily. For multi-page or text-heavy documents, PDF Print or PDF/X is the better choice because it preserves layout, fonts, and bleed in a way a flat image cannot.
Is there a difference between JPG and PDF?
Yes. JPG is a flat, compressed image format best suited to single photos, while PDF can hold multiple pages, embedded fonts, and editable text fields, and handles mixed text-and-image layouts with more consistency across devices.
Is a JPG printable?
Yes, a JPG prints perfectly well for wall art and photo-style designs as long as it’s exported at 300 DPI with correct pixel dimensions for the target print size. Quality settings of 90 to 95% keep the file visually lossless at that resolution.
Is a JPG file good for printing?
It’s good for single-image prints such as wall art or posters, provided the resolution and pixel dimensions match the finished size. For multi-page products or anything needing embedded fonts and bleed for a commercial printer, PDF Print remains the stronger option.