
Mini kits crafting: your practical starter guide
Whether you have just discovered the joy of miniature builds or you have already spent a few evenings puzzling over a tiny greenhouse scene, a solid guide to mini kits crafting can make the difference between a project you are proud of and one that ends up in a drawer. Mini kits combine the focus of model making with the creativity of decorative craft, producing finished pieces that are genuinely impressive. The challenge for most beginners is not lack of talent. It is lack of preparation, the right tools, and a clear sequence to follow.
Table of Contents
- Key takeaways
- Your guide to mini kits crafting: tools and workspace
- Step-by-step assembly for mini kit projects
- Common challenges and how to avoid them
- Finishing, maintaining, and displaying your mini kit
- My honest take after many builds
- Start your mini kits journey with Craftsuprint
- FAQ
Key takeaways
| Point | Details |
|---|---|
| Prepare before you build | Read all instructions fully before opening a single bag to avoid disorganisation and costly mistakes. |
| Budget for extras | Most kits exclude adhesives and batteries; both cost under £5 combined and must be sourced separately. |
| Dry fit before glueing | Test every wood or card piece for alignment before applying adhesive to prevent splits and misfits. |
| Pace your sessions | Splitting complex builds into two to four sessions reduces fatigue errors and allows adhesive to cure properly. |
| Display and protect | Allow all adhesives to cure fully before moving your finished piece, and dust gently to preserve fine details. |
Your guide to mini kits crafting: tools and workspace
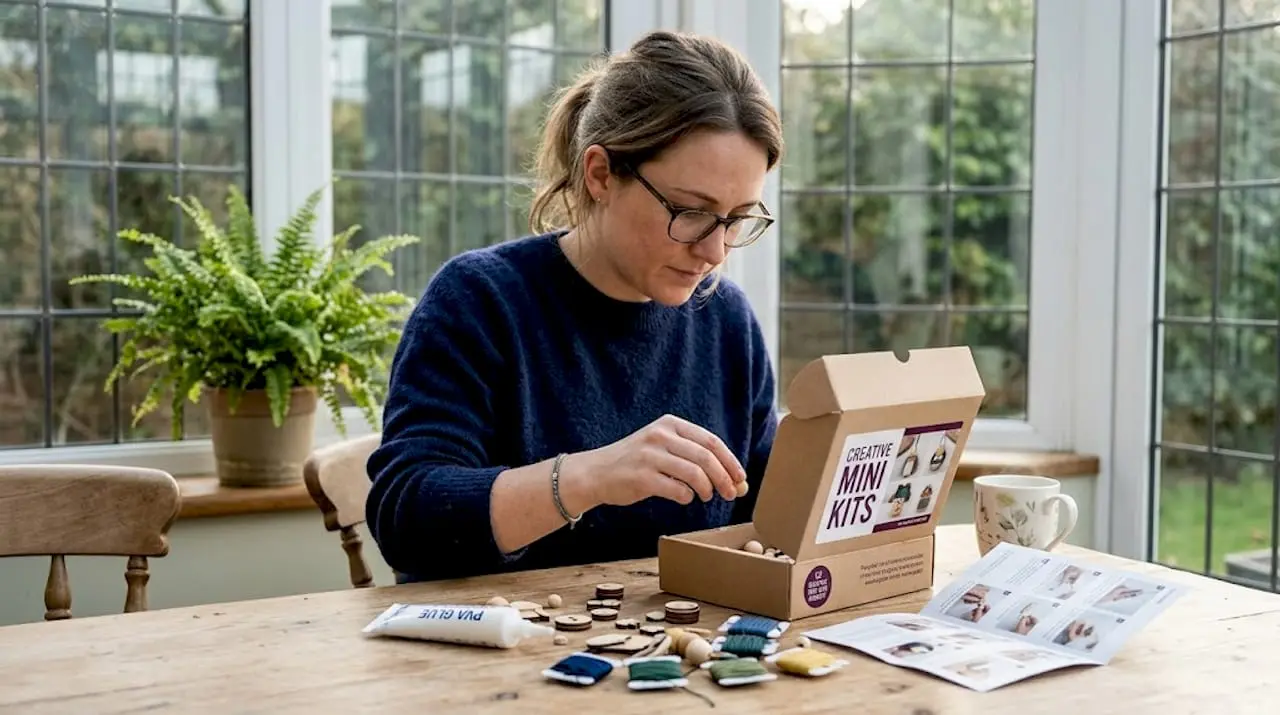
Understanding what is a mini kit in crafting sets you up from the start. A mini kit is a packaged set of pre-cut or pre-printed components, usually wood, card, or paper, along with instructions for assembling a small, detailed scene or object. Themes range from cosy bookshops and botanical greenhouses to seaside cottages and festive rooms. The role of mini kits in crafting is part relaxation, part problem solving, and entirely rewarding.
Before you open the box, gather the right tools. Most kits include the core components but leave out consumables such as PVA glue, cyanoacrylate (super glue), and batteries, with the combined cost usually under £5. Knowing this ahead of time prevents a frustrating mid-build dash to the shops.
Here is a summary of the tools you will want within reach:
| Tool or material | Function |
|---|---|
| Tweezers (fine tip) | Placing tiny components accurately without fingerprints or slipping |
| Craft knife and cutting mat | Trimming tabs and tidying edges cleanly |
| PVA glue and small brush | Bonding paper, card, and light wood pieces |
| Cyanoacrylate (super glue) | Fast bonding of structural wood joints |
| Cocktail sticks | Applying small dots of glue with precision |
| Good task lighting | Seeing fine details and colour-matching accurately |
| Small storage trays or muffin tin | Keeping sorted components separated and easy to find |
| Tweezers stand or clip | Holding glued parts in position while they cure |
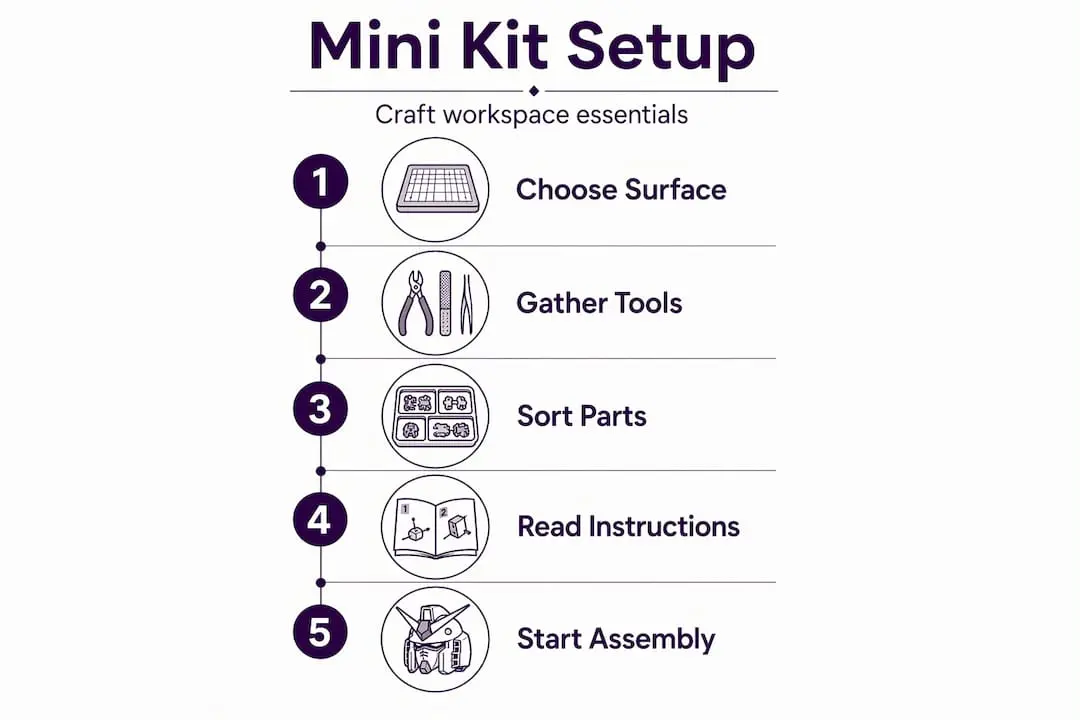
Workspace setup deserves as much thought as the kit itself. Laying all components on a clean, flat surface before you start building aids workflow considerably and prevents you losing the tiny pieces that always seem to vanish on patterned tablecloths. Work under a dedicated craft lamp rather than ambient ceiling light. Natural daylight bulbs reveal colour and detail far better than warm household bulbs.
Pro Tip: Buy a twin pack of PVA and a small bottle of cyanoacrylate together online. You will spend less than £4 for both, and having two glue types means you can choose the right bond strength for each part rather than forcing one product to do everything.
Step-by-step assembly for mini kit projects
One of the most consistent findings across mini craft kits tutorials is that reading instructions fully from start to finish before touching a component dramatically reduces mistakes. It sounds obvious, yet the temptation to start building immediately is real. Resist it. Spend ten minutes reading through everything, including the later steps, so you understand where the project is heading.
Once you have read through fully, follow this sequence:
-
Sort and label all components. Open bags one at a time and organise pieces into your trays by type or by assembly stage. Many kits number or letter the components. Match them to the instructions before you begin.
-
Dry fit the structural frame. Place all main panels and supports together without any glue. Dry fitting wood pieces before glueing is the single most important technique in wooden mini kits. It confirms alignment and reveals any pieces that need slight adjustment before adhesive makes corrections permanent.
-
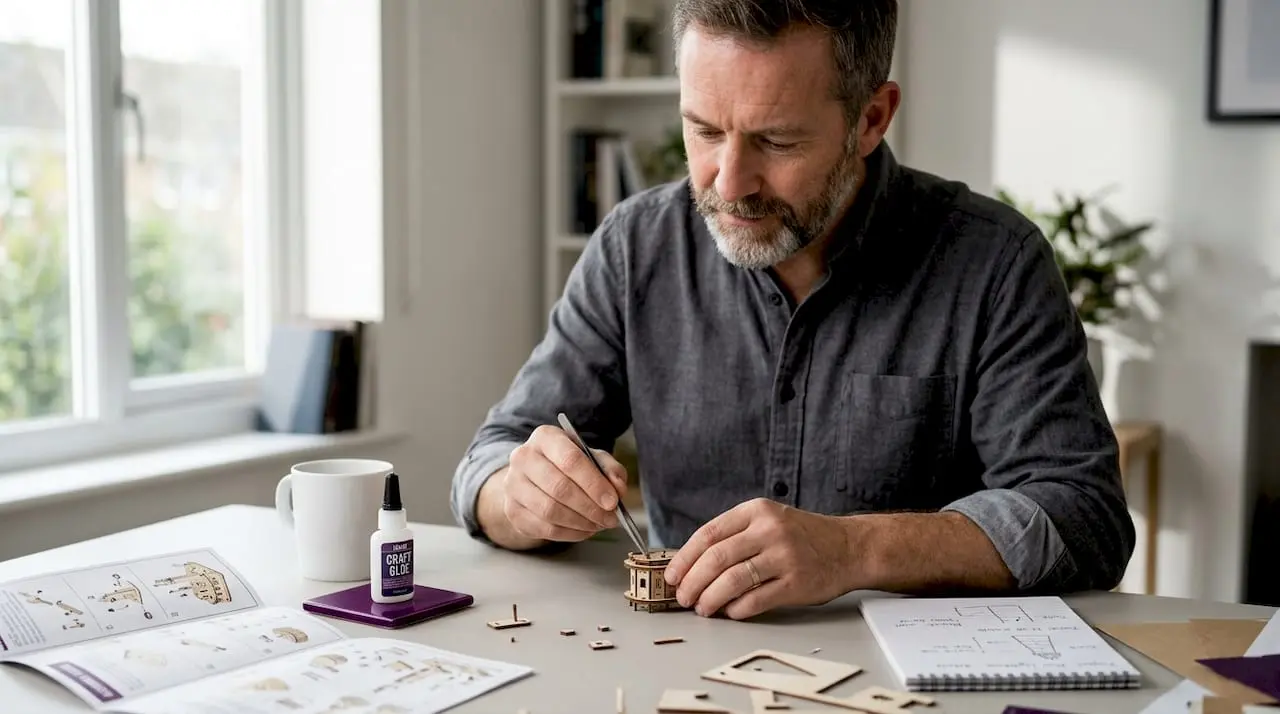
Glue the main structure. Work from the base upwards. Apply glue sparingly with a cocktail stick, hold the joint steady for thirty to sixty seconds, and allow the structure to sit undisturbed for at least fifteen minutes before adding the next layer.
-
Add decorative details and small elements. Furniture, foliage, printed paper panels, and miniature accessories all come at this stage. Use tweezers for anything smaller than your fingernail. Patience here pays off visually more than at any other stage.
-
Install lighting elements if your kit includes them. Thread wire through pre-drilled channels before closing any walls. Test the circuit before sealing the build. If the lighting does not work after sealing, accessing it later is genuinely difficult.
-
Final checks and curing time. Splitting complex projects into two to four sessions not only reduces fatigue but gives each layer of adhesive proper curing time, which improves the finished quality significantly.
Pro Tip: If a tab feels too tight to slot into its groove, resist forcing it. Slightly trimming tabs with a sharp craft knife takes seconds and prevents the splitting or buckling that ruins a clean join. A fraction of a millimetre is often all that is needed.
Beginners should plan realistically. Beginner kits typically require three to five hours, intermediate builds five to eight hours, and advanced projects eight hours or more. Set that expectation before you start, and the pace will feel natural rather than stressful.
Common challenges and how to avoid them
Most beginner mistakes stem from skipping full instruction reading and poor organisation rather than any lack of manual skill. Knowing this shifts the focus helpfully from “am I good enough” to “am I prepared enough.”
Workspace clutter
A cluttered surface is the enemy of small-scale crafting. One knocked tray can scatter ten components you will spend twenty minutes searching for. Keep only the current stage’s pieces on your work surface.
Forcing tight parts
Wooden laser-cut kits have a small tolerance for humidity changes. A piece that fits perfectly in the kit photograph may feel stiff in your hands. Never force it. Dry fit, identify the issue, and trim with a craft knife if needed.
Wire elements in botanical kits
Botanical and greenhouse style mini kits include copper or metal wire for plant stems and structural frames. Wire bending must be done once precisely using the reference images in the instructions as your guide. Repeatedly bending wire back and forth causes metal fatigue and eventual breakage. Measure against the image carefully, then bend once with confidence.
Protective film on acrylic or plastic panels
Many kits include transparent plastic or acrylic window panels with a protective film. Remove this film before assembly. Forgetting it is a surprisingly common mistake that dulls window clarity in the finished build.
Here are some quick troubleshooting tips to keep in mind:
- Glue refusing to bond: wipe both surfaces clean with a dry cloth and ensure they are free of dust or oil from your fingers.
- Paper panel bubbling: apply PVA thinly and use a flat, firm tool to smooth outward from the centre.
- Misaligned wall: if the glue is still tacky, gently wiggle the piece free. If fully cured, a craft knife can score the join, though this risks surface damage.
- Missing or damaged component: contact the kit manufacturer directly. Most reputable brands will send replacements.
Please note: Mini kits involve craft knives, fine wire, and very small components. Always work on a proper cutting mat, keep the blade away from your fingers during trimming, and store kits away from young children.
Pro Tip: If you find yourself losing focus or making clumsy errors, stop. Patience and thoughtful handling are just as important as manual skill. A fifteen-minute break is far cheaper than a damaged component.
Finishing, maintaining, and displaying your mini kit
The final stage of mini kits crafting is where your project transforms from an assembly into a display piece. Give the following steps proper attention and your finished build will last for years.
- Test lighting before you seal. Switch the lighting circuit on and confirm every bulb works before closing any final panels. Replace batteries at this stage if needed.
- Allow full adhesive cure. PVA typically cures in two to four hours but reaches full strength after twenty-four hours. Cyanoacrylate bonds faster but benefits from a full hour before any stress is applied to joints. Do not move or display your kit before everything is solid.
- Dust with care. Use a soft, dry watercolour brush or a clean make-up brush to dust delicate areas. Never use a damp cloth on paper or card components, as moisture causes warping and colour bleed.
- Display thoughtfully. A glass cloche, a shallow display box, or a shelf with a small acrylic screen protects the piece from dust accumulation. Avoid direct sunlight, which fades printed paper panels and yellows adhesive over time.
- Consider gifting. A completed mini kit project in a simple gift box with a handwritten note makes a far more personal and memorable gift than almost anything you could buy ready-made. The hours invested show, and recipients notice.
My honest take after many builds
I will be straightforward: the first time I worked through a botanical greenhouse kit, I skipped the wire-bending instructions because they looked self-explanatory. I broke two stems and lost a solid forty minutes reworking a part I had damaged in the first five. That one shortcut cost more time than reading the whole instruction sheet would have.
What I have learned from building many of these kits is that preparation is not the boring part before the fun begins. It is the fun, in a quiet, methodical way. Sorting components into a muffin tin, reading through the full guide with a cup of tea, laying out your tools before touching the kit. That ritual gets your mind into the right pace for the work ahead.
The other thing worth saying is that workspace organisation changes your results noticeably. I built two versions of the same intermediate kit: one on a cleared, lit, well-organised desk, and one on a cluttered kitchen table with poor light. The first build took less time and looked significantly better. The physical environment matters as much as the technique.
Mini kits crafting rewards people who are willing to slow down. If you are the type of person who enjoys the process as much as the result, these kits will give you hours of genuine satisfaction. And when you are done, you have something beautiful to show for it.
— Rob
Start your mini kits journey with Craftsuprint
If you are ready to put this guide into practice, Craftsuprint has everything you need to get started confidently.

From craft supplies and downloadable projects to tutorials designed for hobbyists at every level, Craftsuprint brings together printable mini kits, card making resources, and the adhesives and accessories that most kits leave out of the box. Whether you want to source materials for your next build or browse beginner-friendly projects to print and assemble at home, the Craftsuprint catalogue makes it easy to move from reading to creating. Head over and explore what is available.
FAQ
What is a mini kit in crafting?
A mini kit in crafting is a packaged set of pre-cut or pre-printed components designed to be assembled into a small, detailed scene or decorative object. Kits typically include structural pieces and instructions but often exclude adhesives and batteries.
How long does a mini kit project take to complete?
Beginner kits take three to five hours, intermediate builds five to eight hours, and advanced projects eight hours or more. Spreading the work across multiple sessions improves both quality and enjoyment.
What adhesive should I use for a mini kit?
Most wooden mini kits work well with a combination of PVA glue for card and paper elements and cyanoacrylate for structural wood joints. Both are affordable and widely available, with a combined cost typically under £5.
How do I avoid breaking wire elements in botanical kits?
Bend wire once carefully using the reference images in the kit instructions as your guide. Repeatedly bending and straightening wire causes metal fatigue and breakage, so measure precisely before committing to the bend.
Can mini kit projects be given as gifts?
Absolutely. A completed mini kit project, displayed in a simple gift box, makes a highly personal and memorable handmade gift. The craftsmanship is visible and the recipient receives something unique rather than mass-produced.