
Handmade paper crafting: techniques, tools, and inspiration
Paper crafting is not just about scissors and glue sticks. Many people picture a quick cut-and-paste session, but handmade paper crafting is a far richer practice where paper becomes the central medium, shaped and formed through deliberate manual skill. From pulping old newspapers into fresh sheets to embossing intricate patterns on hand-formed cards, this guide walks you through the full picture. Whether you are entirely new to the craft or looking to deepen what you already know, you will find concrete techniques, honest tool advice, and plenty of creative direction here.
Table of Contents
- What is handmade paper crafting?
- Papermaking: the process step by step
- Essential tools and materials for handmade paper crafting
- Handmade vs machine-made paper: key differences
- Our take: why the “messy bit” is the whole point
- Explore printable paper craft resources at Craftsuprint
- Frequently asked questions
Key Takeaways
| Point | Details |
|---|---|
| Dual-track craft | Handmade paper crafting means both making sheets by hand and using them creatively in projects. |
| Material choices matter | The type of fibre or recycled input greatly affects your final sheet’s strength and texture. |
| Unique handmade results | Handmade paper stands out for its tactile feel and irregular edges, unlike machine-made sheets. |
| Simple tools to start | Crafters can begin with basic tools and later add specialist gear for complex effects. |
What is handmade paper crafting?
Handmade paper crafting is actually two connected things working together. The first is making paper by hand, producing sheets from pulped fibre or recycled material through a physical, small-batch process. The second is creative crafting with paper, using those sheets (or any paper you have to hand) to produce decorative and functional items. Understanding both sides is what separates a thoughtful crafter from someone who only knows half the story.
Papercrafting as a discipline covers a wide range of techniques once you have your paper ready, including cutting, folding, pasting, stamping, embossing, and other surface effects for cards, scrapbooks, and related projects. This means even if you buy commercial paper, you are still engaging in paper crafting. But when you produce the paper itself by hand, you gain creative control over texture, thickness, colour, and finish that no shop-bought sheet can fully replicate.
Here is a glimpse of what handmade paper crafting projects can look like:
- Hand-formed sheets embedded with flower petals or leaves for botanical art cards
- Textured scrapbook pages made from recycled paper pulp in earthy tones
- Layered greeting cards combining hand-pressed sheets with stamped imagery
- Decorative gift wrapping from thin, translucent handmade tissue sheets
- Bookbinding using thick, structured handmade pages as covers or endpapers
- Embossed notecards pressed with lace or textured fabric while still wet
“The beauty of paper crafting lies in its accessibility. With the right understanding of materials and process, any crafter can produce something genuinely unique.”
The crafting supplies for paper projects you choose will shape what becomes possible, making it worth thinking carefully about what you want to create before you begin gathering materials.
Papermaking: the process step by step
With the basics defined, let us walk through how handmade paper is actually made. The core methodology for making handmade paper involves breaking down paper or fibre into pulp, forming the sheet on a mould and deckle, draining, pressing and couching, then drying, resulting in tactile, variable sheets that carry real character.
Here is the full process laid out step by step:
- Collect and tear your materials. Gather recycled paper, plant fibre, or cotton linter (the raw material many papermakers favour). Tear everything into small pieces, roughly 2 to 3 centimetres square, to help the blending process.
- Soak the material. Place your torn pieces into water and leave them to soak for at least two hours, or overnight for tougher materials. Longer soaking produces softer, more easily dispersed fibres in the finished pulp.
- Blend into pulp. Add soaked material to a blender with plenty of water. Short, controlled bursts work better than long blending, as over-processing can shorten fibres and weaken the final sheet. Aim for a consistency that looks like thin porridge.
- Prepare your vat. Pour the pulp into a large, flat tub filled with water. The ratio of pulp to water directly affects sheet thickness; more pulp means a thicker, sturdier sheet.
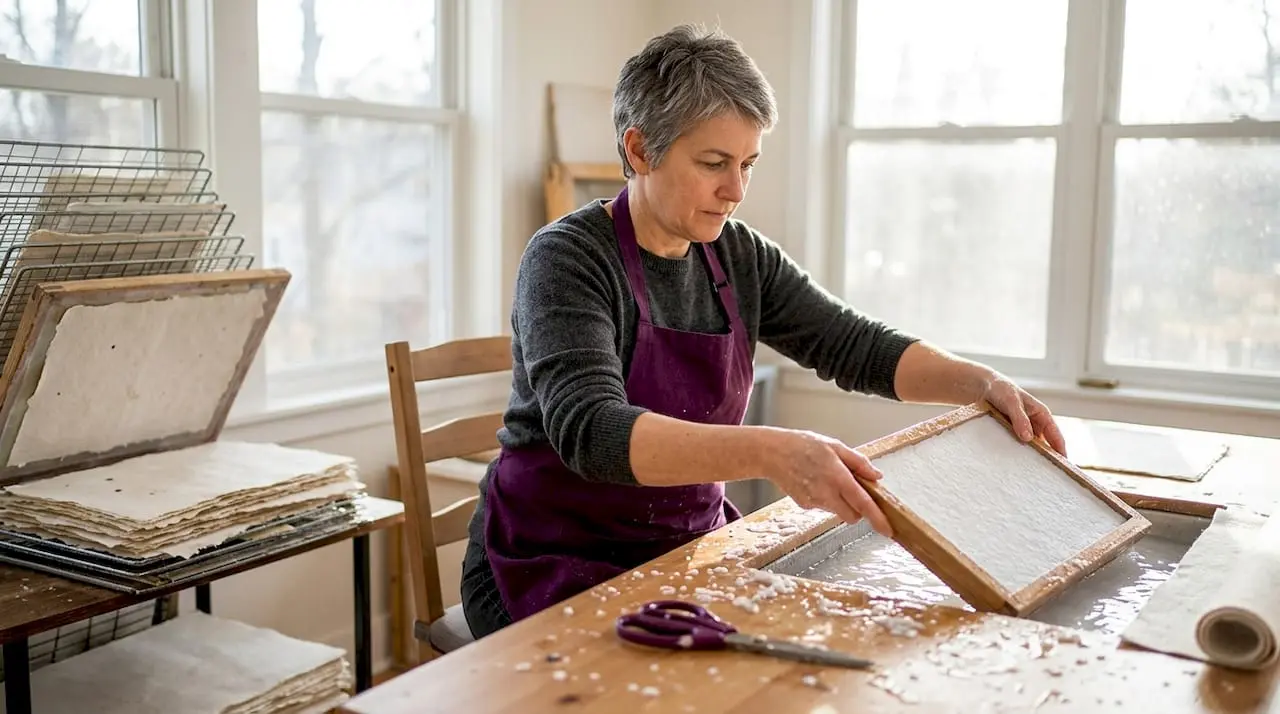
- Form the sheet. Slide your mould and deckle (the framed mesh screen and its surrounding border) into the vat at an angle, scoop it upwards in a smooth, level motion, and allow the pulp to settle evenly across the mesh.
- Drain and shake. Hold the mould level while water drains through the mesh. Gentle side-to-side movement encourages fibres to interlock and strengthens the eventual sheet.
- Couch the sheet. Carefully flip the mould face-down onto an absorbent felt or cloth. Press firmly and peel the mould away, leaving the wet sheet on the felt. This step is called couching (pronounced “cooching”).
- Press and dry. Stack several couched sheets between felts, apply firm, even pressure to squeeze out excess water, then leave sheets to dry flat or hang them gently in a well-ventilated space.
“Drainage control is the single most powerful variable a beginner can adjust. Change how long you let the sheet drain before couching, and you change the whole character of the paper.”
Pro Tip: A key quality lever is thickness control during sheet formation. Adjust the ratio of pulp to water in your vat before dipping your mould. More pulp, thicker sheet. Practise this adjustment across a few small batches before committing to a large run.
Essential tools and materials for handmade paper crafting
Once you know the process, you can set up your workspace with the right tools. The good news is that the basic setup is genuinely affordable, and many crafters start with items they already own.
Core tools at a glance
| Tool | Purpose | Beginner tip |
|---|---|---|
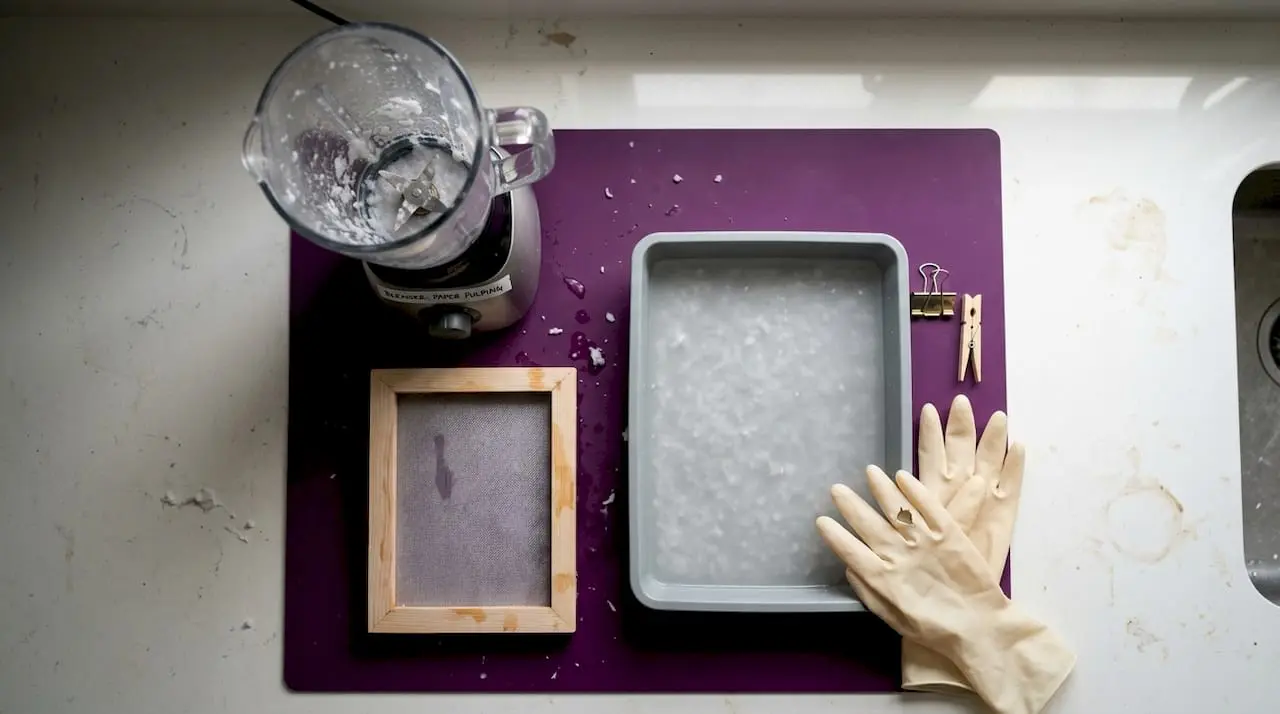
| Blender | Pulps fibre and recycled paper into workable slurry | Use an old one, as pulp is hard on blades |
| Mould and deckle | Frames and supports the wet sheet during formation | Buy or make from old picture frames and mesh |
| Large tub or washing-up bowl | Acts as the vat for pulp and water | Must be wider than your mould |
| Absorbent felts or cloths | Used for couching and pressing wet sheets | Old woollen blankets work well |
| Sponge or rolling pin | Applies pressure during pressing stage | A rolling pin is surprisingly effective |
| Drying board | Flat surface for drying formed sheets | Smooth plywood or acrylic sheeting |
Common tools for handmade paper also include the mould and deckle as the essential forming frame, with containers and felts completing the basic kit. Beyond the core set, you can expand your range once you are comfortable with the basics.
Here are some optional tools that open up creative possibilities:
- Rubber stamps and ink pads for surface decoration after drying
- Embossing powders and heat guns for raised, glossy patterns on finished sheets
- Texture screens (lace, wire mesh, bubble wrap) pressed onto wet sheets for surface effects
- Dried botanicals like petals, leaves, or seeds embedded during sheet formation
- Pastels and watercolour washes applied to dry sheets for colour variation
Pro Tip: Start with what you have before spending money on specialist gear. A kitchen blender, a handmade frame from old timber, and some net curtain fabric will get you producing your first sheets. Only invest in better equipment once you know which aspects of papermaking excite you most. You can explore where to buy papercrafting tools once you have identified what you genuinely need.
Handmade vs machine-made paper: key differences
Choosing paper for your craft makes a big difference, so how does handmade compare to commercial sheets? The answer matters not just aesthetically but practically, because the paper you use shapes what techniques will work and what the finished item will look and feel like.
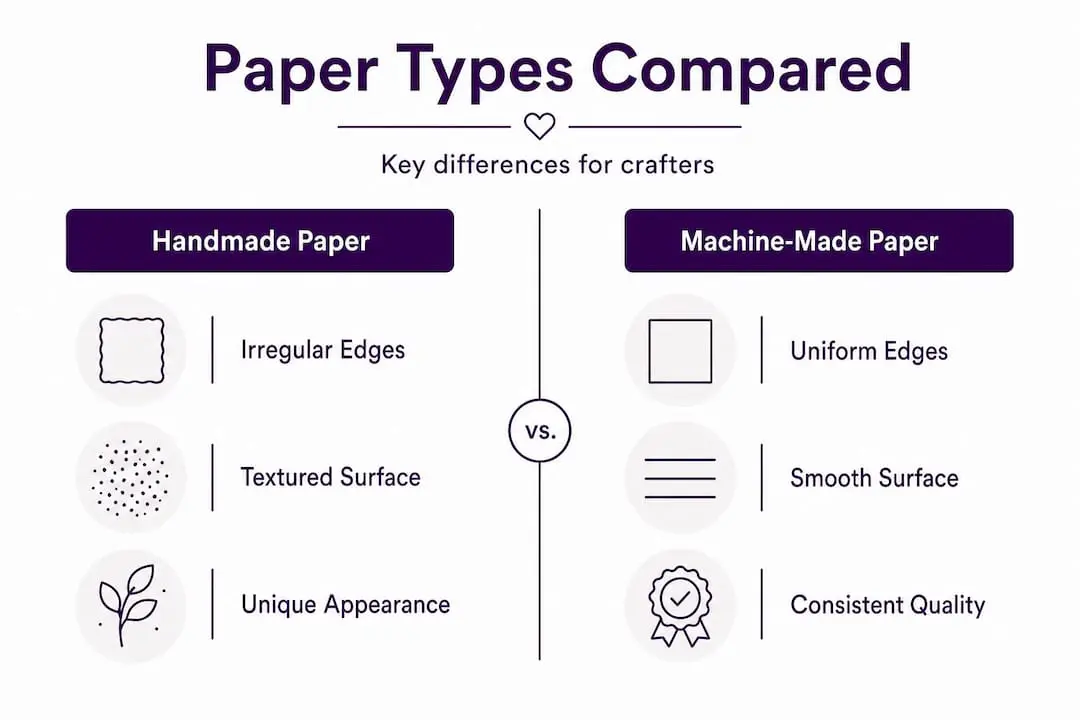
Handmade paper differs from machine-made through visible and tactile characteristics including irregular deckled edges, fibre texture visible to the naked eye, and meaningful sheet-to-sheet variation. These qualities are not flaws; they are features that many artists, calligraphers, and bookbinders actively seek out.
Comparison: handmade vs machine-made paper
| Characteristic | Handmade paper | Machine-made paper |
|---|---|---|
| Edges | Soft, irregular deckled edges | Clean, straight, trimmed |
| Thickness | Variable across and between sheets | Highly consistent throughout |
| Surface texture | Visible fibre, organic variation | Smooth and predictable |
| Colour | Natural, slightly uneven tones | Uniform, often bright white |
| Ideal uses | Art, cards, calligraphy, bookbinding | Printing, writing, packaging |
| Environmental feel | Rustic, artisan character | Industrial, functional |
Why does this matter for crafters? If you are making greeting cards or scrapbook pages where texture and personality are part of the design, handmade paper is genuinely hard to beat. Its deckled edges frame a piece naturally without cutting, and its surface absorbs inks and watercolours in beautiful, unpredictable ways.
Machine-made paper, on the other hand, is ideal when you need consistency: for printed digital elements, precise cutting, or large-scale production. Many crafters use both together, combining handmade sheets for focal elements with commercial card stock for structured bases.
Materials matter: picking and recycling for purpose
Beyond method, what you put in determines what comes out. Not all recycled paper behaves the same in a papermaking vat, and choosing the wrong input material for your project can result in frustration rather than finished sheets.
Recycled-material choices create distinct results: some waste papers like tissue wrapping pulp into weaker, fluffier handmade sheets, making them less suitable for tasks like calligraphy, origami, or bookbinding. Meanwhile, office paper, egg cartons, and cotton rag produce stronger, more structured results.
Here is a practical breakdown of common recycled inputs and what to expect:
- Office printer paper: produces firm, bright sheets; excellent for cards and writing surfaces
- Newspaper: creates grey, fibrous sheets; good for textured decorative art, not for fine writing
- Egg cartons (grey board): results in thick, slightly rough sheets; ideal for bookbinding covers
- Tissue paper: pulps into delicate, translucent sheets; beautiful for layering but too weak for binding
- Cotton fabric scraps: produces strong, long-lasting paper; perfect for artist papers and journals
For functional uses you need stronger fibres and better starting paper, while decorative art projects can tolerate and even celebrate more “imperfect” recycled inputs. This is worth knowing before you start, because a batch of tissue-pulp paper that falls apart when you try to fold it is a disheartening experience.
Pro Tip: Always test a small batch before committing your best materials to a full run. Make three or four small test sheets from a new paper source, let them dry fully, and test them for folding, writing, and handling before you scale up. This saves both time and material in the long run.
Our take: why the “messy bit” is the whole point
There is a tendency in crafting communities to skip the hardest, most uncertain parts and jump straight to the neat, photographable finish. When it comes to handmade paper crafting, we think that is exactly backwards. The pulping stage is wet, unpredictable, and sometimes a bit chaotic. The couching stage requires confidence and a steady hand. The drying stage demands patience. These are not obstacles to the craft; they are the craft.
What you discover in those messy, uncertain moments is an understanding of material that no tutorial shortcut can teach. You learn how fibre behaves under pressure. You start to see why some sheets dry with beautiful waves and others stay flat. You realise that the deckled edge on a finished card is not an accident but the direct result of choices you made at the mould and deckle stage. That knowledge transforms how you approach every subsequent project.
We would also argue that handmade paper crafting is one of the most satisfying gateways into wider creative practice. Once you understand how paper is formed, you look at every sheet differently. You start to ask what went into making it, how thick the pulp was, what fibres were used, whether it was pressed flat or textured. That curiosity is what drives crafters from beginner to genuinely skilled. Do not be too quick to skip the mess.
Explore printable paper craft resources at Craftsuprint
If the papermaking process has sparked your imagination for what to create with your sheets, you are in exactly the right place.

At Craftsuprint, we offer a wide collection of printable craft downloads, card-making kits, and paper project templates designed specifically for hobby crafters who love working with paper. Whether you want to layer your handmade sheets with beautifully printed digital elements, find inspiration for themed card designs, or discover new embellishment ideas, our marketplace has resources to support every stage of your creative process. Browse our catalogue, pick up a weekly freebie, and connect with a community of paper crafting enthusiasts who understand exactly what you are making and why it matters.
Frequently asked questions
What projects can you make with handmade paper?
Handmade paper suits cards, scrapbooks, gift tags, textured artwork, and decorative books, as papercrafting techniques like stamping, folding, and embossing work beautifully on its organic surface.
Is handmade paper better than store-bought?
Handmade paper offers unique textures and deckled edges valued for art and crafts, but it is less uniform than commercial sheets, so the best choice depends on your project’s needs.
Can you use any recycled paper for papermaking?
Nearly any paper can be recycled into pulp, but tissue creates weaker sheets that are not suitable for all crafts, especially calligraphy, origami, or bookbinding where durability matters.
What is the biggest challenge for beginners in handmade paper crafting?
Controlling sheet thickness and texture consistency is the trickiest early skill; adjusting your pulp-to-water ratio across small test batches is the most effective way to build that control.
How can you decorate handmade paper sheets?
You can press dried flower petals, coloured threads, or textured screens into sheets while still wet, or add watercolour washes, stamped designs, and embossing once the sheets are fully dry.