
Creative crafting techniques to transform your projects
Creative crafting techniques are distinct methods that transform ordinary materials into expressive, artistic projects through skilled hands and deliberate process. Whether you work with Altenew blending brushes, 3M adhesive sheets, or resin plaster, the right technique determines the difference between a flat result and a piece with genuine depth and character. Mastering these methods, which professionals also call mixed-media art practices, opens up a range of possibilities that standard craft kits simply cannot replicate. This guide covers six of the most rewarding techniques available to hobbyists right now, with practical steps drawn from expert tutorials.
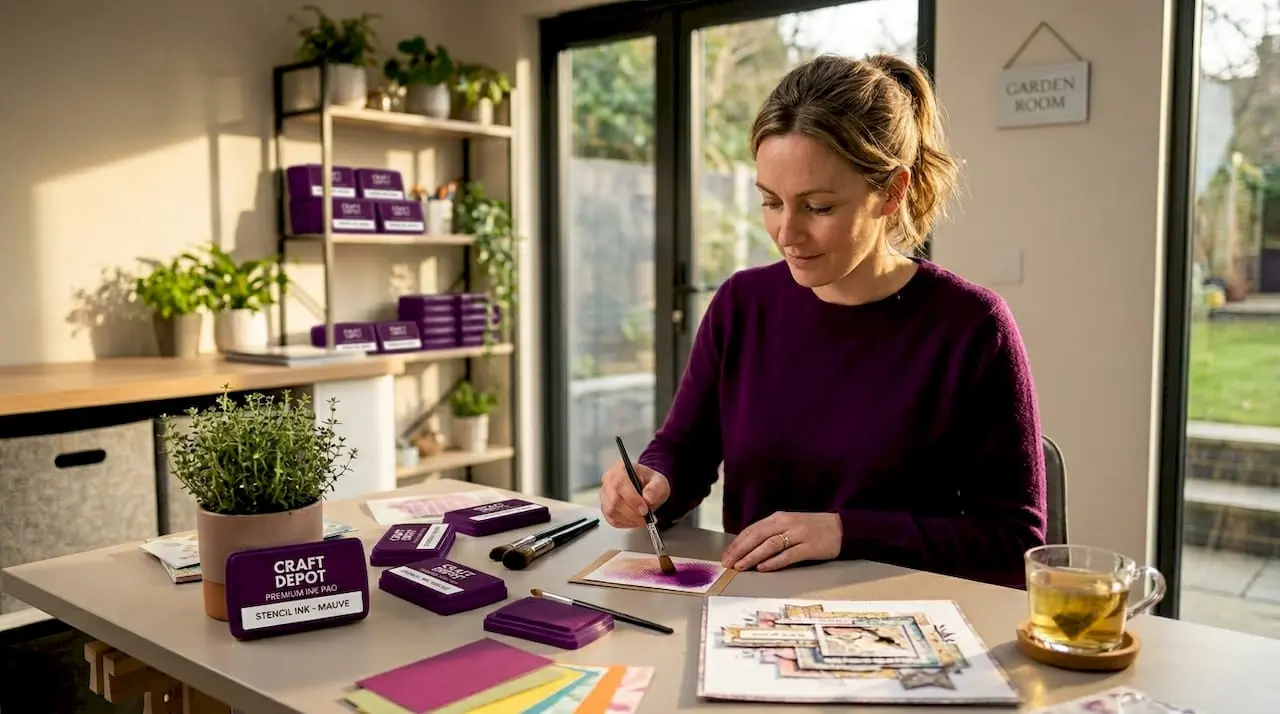
1. What is layered stencil ink blending and why does it matter?
Layered stencil ink blending is a cardmaking technique that builds colour depth by applying ink through sequential stencil layers, each adding dimension to the one beneath. The result is a soft, painterly gradient that looks far more complex than the process actually requires. It is one of the most satisfying creative crafting techniques for paper crafters because the payoff is immediate and the materials are accessible.
The single most important tool in this process is the 9x12 sticky mat. Layer drift prevention is the mat’s primary function, keeping each stencil layer precisely aligned so your gradients stay clean and your edges stay sharp. Without it, even a slight shift between layers destroys the illusion of depth.
Brush selection matters just as much as mat placement. Altenew recommends large brushes for broad background areas and mini or micro brushes for fine stencil details. Using the wrong size creates uneven ink saturation and muddy transitions.
- Choose a limited palette of three to five colours in the same tonal family for cohesive gradients
- Work from light to dark, building intensity gradually rather than saturating early
- Leave deliberate white space within the composition to give the eye a visual resting point
- Finish with shimmer ink or foil accents on the top layer to add luminosity
Pro Tip: Apply ink with a circular motion for soft blends, then switch to a light flicking motion at the edges of each stencil opening to create natural-looking shadows.
2. How do mixed-media scrapbooking techniques combine methods for artistic effect?
Mixed-media scrapbooking is the practice of combining multiple artistic DIY techniques in a single layout, typically including paper piecing, machine stitching, fussy cutting, and hand stitching. The combination creates a tactile, layered result that photographs cannot fully capture. Each method contributes a different visual quality: paper piecing adds colour blocking, stitching adds texture, and fussy cutting adds precision detail.

The order in which you assemble these elements is not a stylistic choice. It is a mechanical necessity. Starting stitching from the top of the layout and working downward keeps the sewing machine path clear. Stitching bottom layers first physically blocks access to upper sections, forcing you to unpick completed work.
Heidi Lewis’s approach to mixed-media layouts demonstrates this sequencing clearly. Her layouts use six strands of white embroidery floss for hand-stitched cloud details, which add a softness that machine stitching cannot replicate. The hand-stitched elements are always added last, after all machine work is complete.
- Plan your full layout on a flat surface before adhering anything permanently
- Complete all fussy cutting first so your pieces are ready to position
- Machine stitch from the top strip downward, securing each layer as you go
- Add paper piecing elements after stitching to cover any exposed thread ends
- Finish with hand stitching for fine detail and tactile texture
Pro Tip: Trace your layout lightly in pencil before committing to adhesive. Mixed-media pieces involve too many layers to correct easily once glued.
3. What is kinusaiga fabric art and how does the adhesive-sheet method work?
Kinusaiga is a traditional Japanese no-sew fabric art form in which fabric scraps are pressed into scored grooves on a foam board to create a stained-glass effect. No needle, no thread, and no sewing machine are required. The technique produces striking geometric or pictorial compositions from silk, cotton, or any fabric with enough body to hold a crease.
The modern approach replaces liquid glue with 3M 468MP adhesive sheets, which are double-sided and repositionable. This change makes the technique genuinely forgiving. If a fabric piece shifts or a colour looks wrong, you can lift and reposition without tearing the foam or leaving residue. Liquid glue offers no such second chance.
Groove depth and fabric overlap are the two variables that determine edge quality. Scoring just deep enough and cutting each fabric piece with a 1 to 2 cm overlap beyond the section boundary produces the clean, sharp edges that define the technique. Too shallow a groove and the fabric pops out; too deep and the board splits.
- Use a bone folder or blunt stylus to score grooves cleanly without tearing the foam surface
- Choose fabrics with a tight weave for crisp edges and avoid stretchy materials that distort
- Limit your palette to four or five colours for a cohesive stained-glass appearance
- Apply the adhesive sheet to the foam section before placing fabric, not to the fabric itself
Pro Tip: Work under good natural light when tucking fabric into grooves. Shadows make it difficult to judge whether edges are fully seated, and loose edges are the most common finishing flaw.
4. How can floral plaster relief art create dimensional sculptures?
Floral plaster relief art is the process of embedding pressed botanical elements into poured resin plaster to create a raised, sculptural surface. The finished piece sits somewhere between a painting and a sculpture, with genuine three-dimensional texture that catches light differently throughout the day. It is one of the more advanced art techniques in this list, but the materials are inexpensive and widely available.
The required materials are straightforward: resin plaster, a greased mould or frame, pressed flowers, modelling clay, and basic sanding tools. The process begins with arranging pressed flowers on a clay base to set their position, then pouring plaster over the arrangement. Timing the pour correctly is the critical skill here.
Resin plaster sets in 20 to 30 minutes but requires a full 24 hours of curing before you touch it with sandpaper or paint. Attempting to sand a partially set piece causes crumbling and surface damage that cannot be repaired. Treat time as a material property, not an inconvenience.
- Grease your mould thoroughly with petroleum jelly to prevent adhesion
- Arrange pressed flowers face-down on the clay base in your chosen composition
- Mix resin plaster to a smooth, lump-free consistency and pour immediately
- Leave undisturbed for a minimum of 24 hours before removing from the mould
- Sand lightly with fine-grit paper, then finish with limewash, chalk paint, or leave natural
Pro Tip: Restrict your floral palette to two or three botanical varieties. A single type of flower repeated at different scales creates more visual impact than a crowded mix of unrelated species.
5. What are the most effective ways to mix and layer stencils?
Stencil layering is the practice of applying multiple stencil designs in sequence on a single surface, where each layer adds a new visual element without fully obscuring the one beneath. The technique works because partial opacity creates the impression of depth. When done well, the viewer cannot immediately identify where one layer ends and another begins.
The most interesting results come from mixing unrelated stencil sets. Combining floral and geometric stencils creates a tension between organic and structured forms that neither set could produce alone. Yana Smakula’s tutorials demonstrate this approach consistently, using stripe stencils beneath floral overlays to add movement to what would otherwise be a static composition.
Blending motion affects the final texture as much as stencil choice does. Circular motions produce smooth, even coverage, while small flicking motions at stencil edges create shading and the impression of natural light falling across the surface. Using only one motion throughout a piece flattens the result.
- Apply the background stencil layer first using the lightest ink colour in your palette
- Allow each layer to dry fully before placing the next stencil to prevent smearing
- Use a sticky mat beneath your card stock to prevent both the card and stencil from shifting
- Vary ink opacity between layers: heavier coverage on the base, lighter on upper layers
Pro Tip: Flip a stencil over and use the reverse side as a separate design element. The mirrored version of a floral stencil reads as a completely different pattern and doubles your design options without buying new tools.
Key takeaways
The most effective creative crafting techniques combine precise tool use, deliberate sequencing, and material knowledge to produce results that look complex but follow learnable, repeatable processes.
| Point | Details |
|---|---|
| Sticky mats prevent layer drift | Use a 9x12 sticky mat for stencil blending to keep layers aligned and gradients clean. |
| Sequence determines success | In mixed-media scrapbooking, always stitch from the top layer downward to maintain machine access. |
| Adhesive sheets over liquid glue | 3M 468MP sheets make kinusaiga fabric art repositionable and far less messy than traditional methods. |
| Cure time is non-negotiable | Plaster relief art requires a full 24-hour cure before sanding; partial setting causes irreparable damage. |
| Mix unrelated stencil sets | Combining floral and geometric stencils creates depth and movement that single-set layering cannot achieve. |
Why structure is the secret ingredient in creative crafting
I came to layered stencil blending the way most crafters do: by ruining several pieces before understanding why they were going wrong. The ink was fine, the stencils were fine, but the layers kept drifting by a millimetre or two. That tiny shift turned crisp gradients into muddy smears. The moment I started using a sticky mat, the results changed completely. What felt like a creative problem turned out to be a mechanical one.
That experience taught me something I now consider the central truth of advanced crafting: structure liberates creativity. When the technical side is handled by the right tools and the right sequence, your attention is free to focus on colour, composition, and expression. The sticky mat does not constrain the work. It makes the work possible.
The same principle applies to kinusaiga. The adhesive sheet method feels almost too simple when you first read about it, but that simplicity is the point. Because you can reposition fabric without penalty, you spend your energy on colour relationships and pattern rather than on anxiety about making mistakes.
Research by Michelle Mc Cabe confirms what most crafters already sense: textile craft supports wellbeing through the sensory engagement of working with colour, texture, and physical materials. The therapeutic value is not incidental. It is built into the act of making. My advice is to pick one technique from this list, learn its structure thoroughly, and then push against its boundaries deliberately. That is where the interesting work begins.
— Rob
Discover craft downloads and tutorials at Craftsuprint
If any of these techniques have sparked an idea, Craftsuprint is the place to take it further. The platform offers an extensive library of cardmaking downloads and tutorials covering paper crafts, mixed-media projects, and printable design kits suited to every skill level.

Whether you are looking for stencil-ready card kits, paper piecing templates, or themed project downloads, Craftsuprint brings together independent designers and craft enthusiasts in one dedicated marketplace. New freebies, seasonal designs, and community contests are added regularly, making it a genuinely useful resource rather than a static shop. Browse the full catalogue at Craftsuprint and find your next project today.
FAQ
What are creative crafting techniques?
Creative crafting techniques are specific methods that combine materials, tools, and processes to produce handmade art with depth, texture, and visual interest. Examples include layered stencil ink blending, kinusaiga fabric art, and floral plaster relief work.
Which technique is best for beginners?
Kinusaiga fabric art using 3M 468MP adhesive sheets is one of the most accessible starting points because the repositionable adhesive allows mistakes to be corrected without damaging the work. No sewing or specialist equipment is required.
How do I stop stencil layers from shifting?
A 9x12 sticky mat placed beneath your card stock holds both the paper and the stencil in position during ink blending. This prevents the layer drift that causes blurred gradients and misaligned designs.
How long does plaster relief art take to cure?
Resin plaster sets within 20 to 30 minutes but requires a full 24 hours of curing before sanding or painting. Working on a partially cured piece causes surface crumbling that cannot be corrected.
Can I combine multiple techniques in one project?
Mixed-media scrapbooking proves that combining paper piecing, machine stitching, fussy cutting, and hand stitching in a single layout is not only possible but produces richer results than any single method alone. The key is planning your assembly sequence before committing to adhesive.