
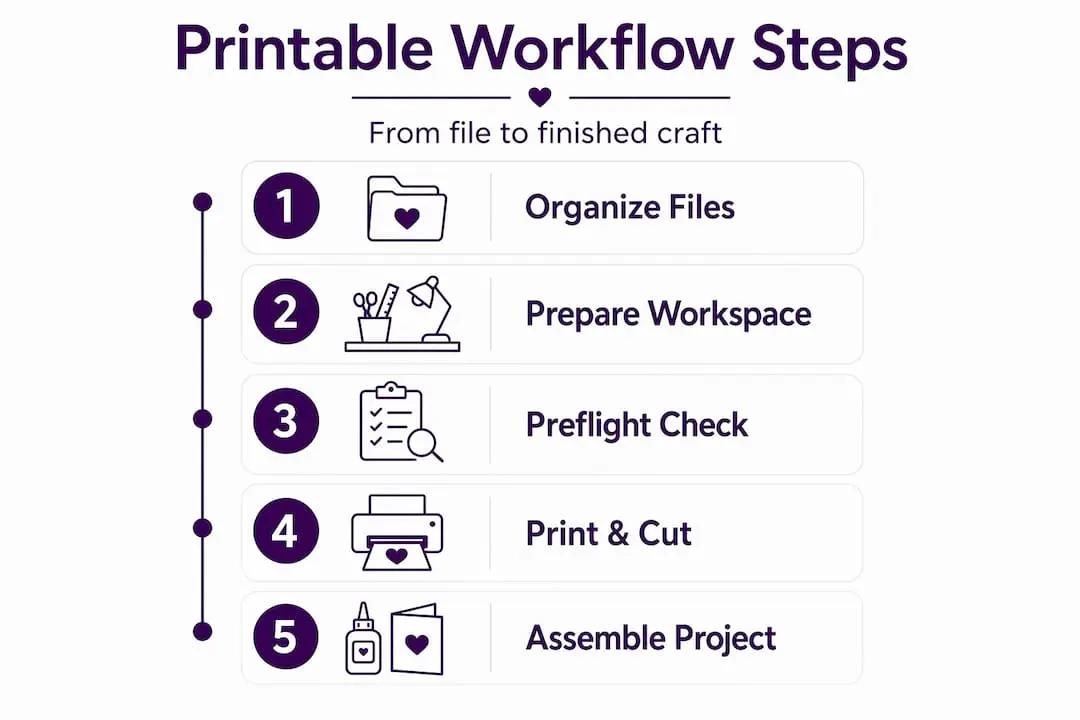
Crafting with printables workflow: your 2026 guide
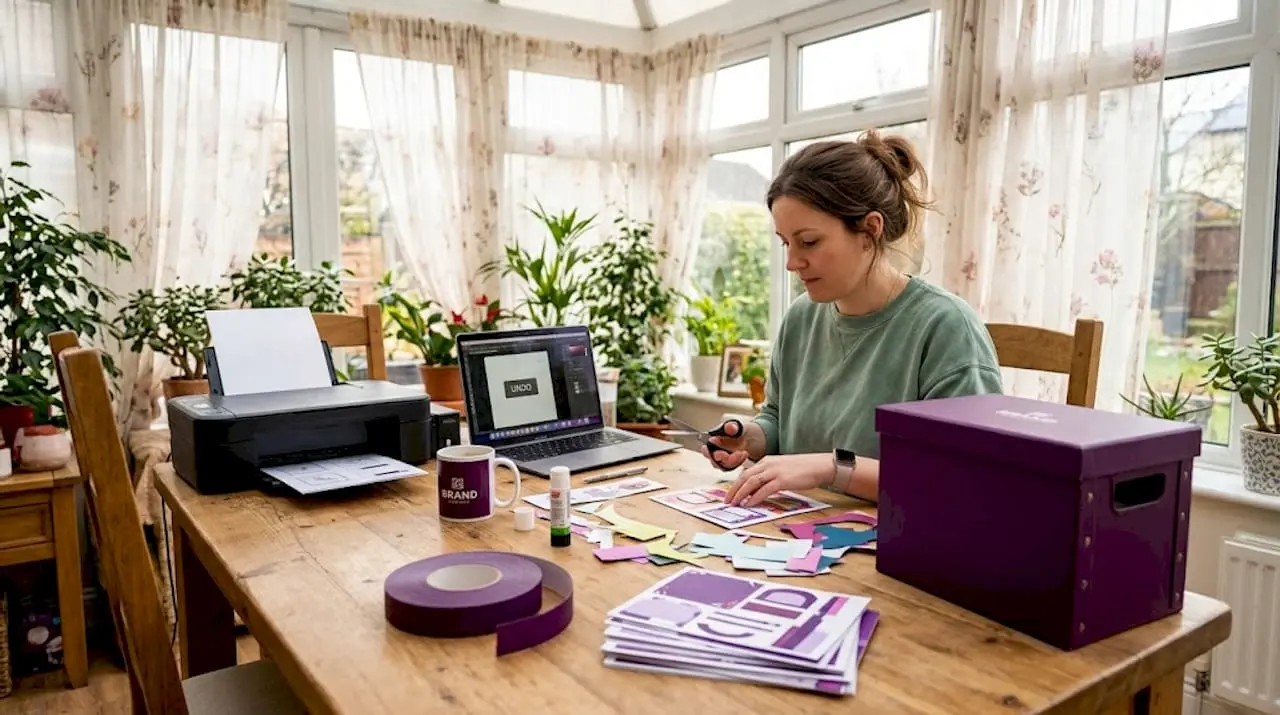
You’ve downloaded a beautiful printable kit, you’re excited to get started, and then it happens. The file won’t open properly, the colours look muddy when printed, nothing is sized correctly, and you’ve wasted half a sheet of good cardstock. A solid crafting with printables workflow fixes every one of those problems before they start. Whether you’re making cards on a Sunday afternoon or running a small craft business with weekly product drops, the difference between frustration and flow comes down to preparation, process, and a few non-obvious tricks most crafters skip.
Table of Contents
- Key takeaways
- Tools and materials for printable projects
- Preparing your files and workspace
- Executing: printing, assembling, and finishing
- Verifying quality and fixing common problems
- My honest take on printable workflows
- Craft more with less effort using Craftsuprint
- FAQ
Key takeaways
| Point | Details |
|---|---|
| Prepare files before printing | Check resolution, embed fonts, and run a preflight scan to catch errors before a single sheet feeds through your printer. |
| Batch your work sessions | Creating and printing in batches can reduce 12-15 hours of work to 3-4 hours for the same output. |
| Match paper to project type | Cardstock suits structured projects like cards and boxes; regular paper works for practice runs and layered assemblies. |
| Separate workflow into three states | Split your process into content creation, packaging, and preflight checking to avoid costly rework spirals. |
| Test before you commit | Always run a test print and unzip downloaded files before cutting into your best materials. |
Tools and materials for printable projects
Before you touch a single file, knowing what you need saves enormous time. The tools fall into two categories: digital and physical. Both matter equally.
On the digital side, you need a reliable PDF reader (Adobe Acrobat Reader is free and handles most printable craft files well), a photo editing program for PNG files, and if you work with SVG files for cutting machines, a compatible design program such as Inkscape or the software bundled with your cutter. Understanding the difference between file types shapes every decision that follows. PDFs are the most universal format for print projects and handle multi-page kits cleanly. PNGs are layered images ideal for digital scrapbooking or projects where you need a transparent background. SVGs are vector files used predominantly with cutting machines, and they carry colour convention rules where specific colours signal specific cut or engrave actions.
On the physical side, your printer, paper choice, and basic assembly tools form the backbone of your printable craft project workflow.
| Tool or material | Purpose | Tip |
|---|---|---|
| Inkjet or laser printer | Produces the finished printable | Use photo-quality settings for detailed designs |
| 200-300gsm cardstock | Structured projects: cards, boxes, tags | Match weight to project requirements |
| 80-90gsm standard paper | Practice prints, layered paper crafts | Use for test prints before committing to cardstock |
| Bone folder | Creates clean, sharp folds | Always score before folding |
| Craft knife and cutting mat | Precise cutting on intricate designs | Replace blades regularly for clean edges |
| PDF reader or design software | Opening and scaling printable files | Adobe Acrobat Reader handles most formats |
Pro Tip: When in doubt between cardstock and standard paper, print a test page on regular paper first. This catches scaling errors and layout surprises without wasting your better stock.
A well-organised physical workspace matters as much as your software. Designate zones: one area for your computer and printer, one clean surface for cutting, one for assembly and adhesives. Keeping these areas separate prevents glue on your keyboard and ink smudges on finished pieces.
Preparing your files and workspace
This is the phase most crafters rush, and it’s where most problems are born. Slow down here and everything downstream becomes easier.
Organise your digital files first
Create a folder structure that mirrors your project types. For example: Printables > Cards > Christmas 2026 > Raw Files. Name files descriptively, something like “robin-card-front-v1.pdf” rather than “download(3).pdf”. This sounds trivial until you’re searching through 400 files at midnight before a craft fair.

The most productive crafters work in batches. Batch creating 20 to 30 projects per session triples output compared to working one project at a time. Apply this to your own practice: gather a week’s worth of projects, prep all the files together, then print in one session.
Run preflight checks before printing
A preflight check is simply asking your file a set of questions before it hits the printer. The key questions are:
- Are all images at 300 DPI or higher? Low-resolution images print blurry regardless of how sharp they look on screen.
- Is the bleed set correctly? For most printed crafts, a 0.125-inch bleed prevents white edges appearing after cutting.
- Are fonts embedded or converted to outlines? Font substitution causes layout shifts that can ruin a carefully designed project.
- Is the colour mode correct? CMYK mode gives more accurate printed colours than RGB, which is optimised for screens.
- Have you exported to PDF/X standard? This format locks in settings and avoids surprises at the print stage.
PDF preflight tools such as those found in Xodo PDF Studio scan for missing fonts, incorrect colour spaces, and low-resolution images, grouping problems by type so you can fix them efficiently. Run the preflight, fix any flagged issues, and run it again until the file passes without critical errors.
Set up your printer correctly
Set your print scale to exactly 100%. Never use “fit to page” for craft templates, as this rescales the design and throws off every measurement. Select your paper type in the printer settings, use the highest quality or photo print mode for detailed designs, and print a single test copy before running a full batch.
Pro Tip: Automating mockup creation with batch templates in photo editing software saves hours when you are preparing listings or project previews. Batch mockup creation replaces manual single-placement work and is one of the highest-leverage steps in any printable business workflow.
Executing: printing, assembling, and finishing
With your files prepped and workspace ready, the execution phase becomes much more predictable. Here is a repeatable print-to-finish process that works for both hobby projects and small business production runs.
- Open the file and confirm settings. Before printing, visually check that the layout matches your expectation. Look for any white borders that shouldn’t be there or text sitting too close to edges.
- Print a single test copy on standard paper. Check scale, alignment, and colour accuracy. Compare it against the designer’s preview image if one is provided.
- Load your chosen paper or cardstock and print the full run. Keep prints face-down in a neat stack to avoid smudging wet ink.
- Score before folding. Use a bone folder and ruler to score fold lines before cutting. This gives sharp, professional edges on cards and boxes.
- Cut with precision. Work on a self-healing mat with a sharp craft knife for intricate designs, or use a trimmer for straight-edged cuts.
- Assemble from the largest piece to the smallest. Glue backing pieces first, then layer upwards. This prevents misalignment.
- Finish and check. Hold finished pieces at arm’s length. Check for uneven edges, visible adhesive, or misaligned layers.
Different printable crafting techniques suit different project types, and knowing which to use saves considerable trial and error.
| Technique | Best for | Key consideration |
|---|---|---|
| Score and fold | Cards, boxes, 3D structures | Always score before folding for clean edges |
| Layer and adhere | Decorative tags, bookmarks | Use the right adhesive for paper weight |
| Die-cut assembly | Intricate shaped pieces | Ensure correct scale before cutting |
| SVG cut file workflow | Machine-cut projects | Preserve colour conventions for cut vs. engrave layers |
| Decoupage layering | Decorative and mixed-media pieces | Seal layers with appropriate medium |
Iteration is part of this process. Professional results come from repeating a project two or three times, not from getting it perfect on the first attempt. Each run teaches you something the instructions cannot.
Verifying quality and fixing common problems
Quality verification is not a final step. It runs in parallel with the whole process. But there are specific checks worth doing once a project is complete.
Hold your finished piece under good lighting and look for the following:
- White border gaps along cut edges, which suggest the bleed was insufficient or the cutting was slightly off-line.
- Colour banding or streaks, which point to low ink levels or a printer head that needs cleaning.
- Blurry text or image areas, which almost always mean the source file was lower than 300 DPI.
- Layout shifts where text sits in unexpected positions, usually caused by font substitution when fonts were not embedded correctly.
- Misaligned layers on assembled pieces, typically fixed by adjusting your cutting technique rather than the file itself.
Printables often underperform because of buyer confusion around instructions, not because of design quality. If you are producing printables for others, clear assembly instructions and a finished preview image dramatically reduce the errors users make.
Pro Tip: Always do a full test download and unzip of your packaged files before sharing or selling them. A missing file or broken link discovered by a customer costs far more time than checking takes.
Collecting feedback after each project or product release is genuinely useful. Note what went wrong, what took longer than expected, and what you would do differently. Over time this builds a personal checklist far more useful than any generic guide, because it reflects your specific tools, materials, and working style.
My honest take on printable workflows
I’ve worked with enough crafters and small printable sellers to say this plainly: most workflow problems are not technical. They are sequencing problems. People skip the preflight. They print on cardstock before running a test. They design twenty products and only then discover their fonts aren’t embedded anywhere.
What I’ve found actually works is treating your workflow as three distinct phases with a hard stop between each. Content creation, packaging, and preflight checking are different modes of thinking, and trying to do all three simultaneously is where errors creep in. Finish one state completely before moving to the next.
The batch processing advice is real and transformative. I’ve seen crafters go from spending an entire weekend on five products to producing twenty in the same time, simply by grouping like tasks together. Batch your design sessions, batch your print runs, batch your cutting.
The other thing I’d push back on is the idea that you need to get the workflow perfect before starting. You don’t. Your first workflow will be messy. Your fifth iteration will be solid. Embrace the rework as tuition fees rather than failures. The crafters who build the most consistent, professional results are not the most talented. They’re the ones who tested the most and adjusted the fastest.
— Rob
Craft more with less effort using Craftsuprint
If setting up files from scratch sounds like a lot of work, it doesn’t have to be your starting point. Craftsuprint offers an extensive library of printable craft downloads designed to slot straight into your workflow. Designs arrive print-ready, with previews that show you exactly what the finished piece looks like before you commit to printing.
From card making kits to themed decorative projects, every download on Craftsuprint is produced by independent designers who understand what crafters actually need. You get clean files, clear guidance, and the kind of variety that keeps your creative sessions fresh. Whether you’re a hobbyist looking for easy printable projects to enjoy on a weekend or a small business building a catalogue of handmade goods, the platform gives you a reliable foundation to work from without the time cost of building everything yourself.
FAQ
What files should I use for printable crafts?
PDFs work best for most printable craft projects as they preserve layout and are universally compatible. PNG files suit projects requiring transparent backgrounds, while SVG files are ideal for cutting machine workflows.
Why do my printables look different when printed?
The most common cause is working in RGB colour mode rather than CMYK. Screen colours appear brighter than print colours, so switching your files to CMYK before export gives a much closer match between screen and printed result.
How do I stop white edges appearing on my cut pieces?
White edges after cutting are usually caused by insufficient bleed in the original file. A standard bleed of 0.125 inches around each edge prevents this when you are creating or editing your own files.
What is the fastest way to scale printable production?
Batch working is the most effective method. Group all design work into one session, all print runs into another, and all assembly into a third. Switching between modes constantly wastes significant time and increases mistakes.
How do I check a PDF is ready to print?
Run a preflight check using a tool such as Xodo PDF Studio or Adobe Acrobat. The preflight tool scans for missing fonts, low-resolution images, incorrect colour spaces, and transparency issues, flagging anything that could cause a printing error.